Showing posts with label LoveAngeline. Show all posts

Sunday, October 1, 2017

Glam Nails Challenge: Oct.01 - Black Cat

Hi guys! This month I'm going to be doing a challenge. I haven't done this in a while, so I hope I can finish. The Glam Nails Challenge was put together by Bianka on IG. The first challenge was Black Cat, and here's what I came up with. I used a neon purple (why is it so difficult to photograph neons!?) as my base and stamped on the cat images, I also used a lime green polish to dot on the eyes. The ears and tail I got by stamping on a pair of bat wings and the tail from the cat image, I also went over the images with a brush and polish to fix any imperfections and darken up the images.
Close-Ups:
Well I hope you guys liked these more than I did. I actually felt ok about these when I first finished, but once I uploaded them to the computer I was disappointed. But oh well, I'll just have to re-do these in the future or something.

I've linked the challenge page in case any of you are interested.

Glam Nails Challenge: Instagram

Anyway, thank you for stopping by. Until next time.
-Ana

Products Used:
Purple: Love, Angeline "Spike's Crush"
Green: Covergirl "#GloAllNite"
Black: Serendipity Polish "Building My Empire"
Top Coat: Seche Vite
Cat Stamping Plate: Born Pretty Store item #35742 (BP-L057)
Medium Clear Jelly Stamper: Born Pretty Store item #26498
Manicure Saver Cotton Claw Tool: Born Pretty Store item #32220

*Giveaway Prizes: Love, Angeline "Spike's Crush"; Serendipity Polish "Building My Empire".
*Past Press Samples: Born Pretty Store Cat Stamping Plate, Medium Clear Jelly Stamper, Manicure Saver Cotton Claw Tool.

Thursday, September 28, 2017

Halloween Smoosh Mani

Hi guys! Today I have a smoosh mani to share with you. I used some neon flakie polishes in green, orange and purple for a Halloween theme because I'm just so excited for Halloween manis. Unfortunately, the purple didn't end up looking purple enough, but I love how it looks. I also added some black and a bit of holo on top of that, and it came out looking pretty cool. I just painted on the polish onto the stamper, and it kind of separated and spread. It's during these times that I wish I knew how to make tutorials for you guys, because it's kind of difficult to explain. But anyway, the polish spread and I dabbed it onto my TwinkledT Glamour Mat to get some of the polish off. Once I was happy with what was left, I stamped it on my nail. The last thing to do was to apply top coat and add the studs.
Close-Ups:
I hope you guys liked them. As always, thank you for stopping by and until next time.
-Ana

Products Used:
Orange: Love, Angeline "Mac-N-Tosh"
Green: Love, Angeline "Apple Blossom"
Purple: Love, Angeline "Spike's Crush"
Black: Serendipity Polish "Building My Empire"
Charcoal Holo: Serendipity Polish "CE0,000,000"
Top Coat: Seche Vite
Cuticle Guard Peel-Off Latex: Born Pretty Store item #36614
Short Clear Jelly Stamper: Born Pretty Store item #39374
Neon Studs: Born Pretty Store item #14438
Silicone Mat: TwinkledT Glamour Mat

*Giveaway Prizes: Love, Angeline "Mac-N-Tosh", "Apple Blossom", "Spike's Crush"; Serendipity Polish "Building My Empire", "CE0,000,000"; TwinkledT Glamour Mat.
*Past Press Sample: Born Pretty Store Short Clear Jelly Stamper.

Tuesday, January 3, 2017

Born Pretty Store Review: Halloween Plates & Rhinestones

 Press Sample / Giveaway Prize / Purchased By Me 

Happy New Year guys! Today I have an overdue review for you. Now I know Halloween came and went, but I'm sure that those of you that love Halloween as much as I do, won't mind seeing some Halloween manis.

Before I begin I will say that the items did take a bit longer than usual to arrive this time. They usually take 4 weeks or so, and this time they took almost double the time. I did message Cynthia from Born Pretty Store though, and she informed me the items were a bit delayed due to customs, but on their way. She is always very kind and helpful which is great.

The good thing was that everything arrived safely as always. The bad thing was that I got sick right in the middle of when I was doing my manis. I actually just started to feel better a few days back, but it completely messed up my mani schedule. So getting this done took a bit longer than I anticipated, and for that I apologize. Okay, now that I've gotten that out of the way, how about some manis?

The first plate is this Trick-Or-Treat Plate BP-81 (item #23264). It has some very cute and non-creepy images, perfect if you don't want a scary mani.
For my mani, I decided to go the traditional route with the color scheme. I used orange, yellow, white and black. I picked up 4 images and did some reverse stamping. Aren't they so cute? Although I accidentally smeared the jack-'o-lantern face.
Close-Ups:
The second plate is this Dracula Plate BP-122 (item #35741). It's a bit more spooky, it has some evil looking pumpkins and even an eye.
For my mani, I ended up picking the pumpkins. Once again, I picked up the images and did some reverse stamping on the pumpkin. It has a kind of 3D look, pretty cool right?
Close-Ups:
The third plate is this Halloween Silhouettes Rectangular Plate BPL-031 (item #23267). It mostly has some fun silhouettes, but it does have a more dark/creepy one too.
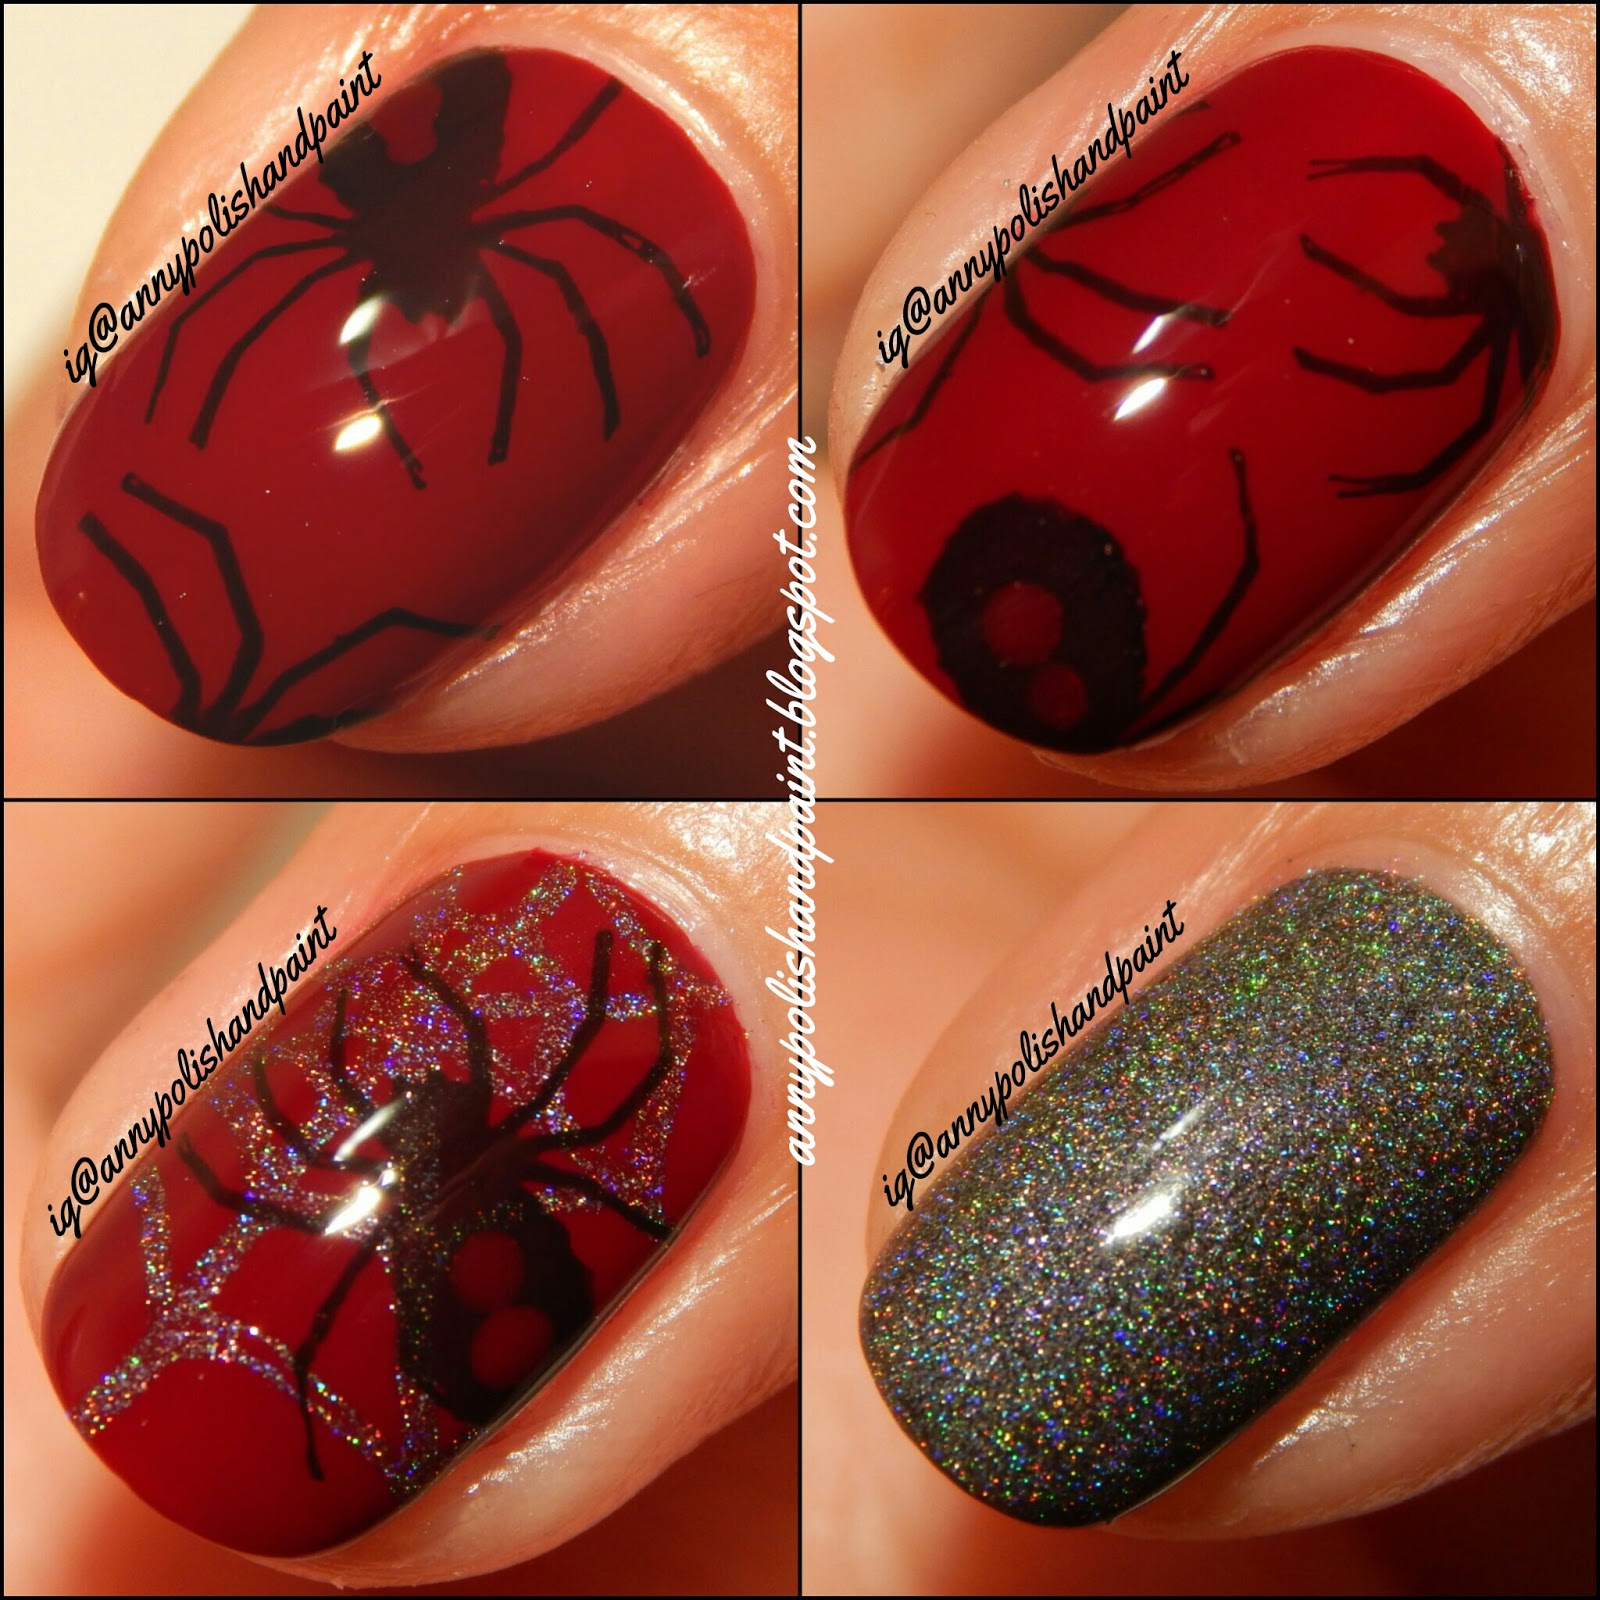
The first mani I did with this plate is this cool Black Widow mani. I did struggle quite a bit when trying to pick up the web image, it's so close to the edge and I'd never worked with a rectangular plate before. All I need is practice, I'm sure.
Close-Ups:
I also received this awesome Black Rhinestone Wheel (item #12412). The listing says it has about 500 pieces, and they come in a variety of sizes. I love the size variety because you can choose the size that best suits your design and/or style.
This is the mani I did using both the rectangular plate I showed you last, and the rhinestones. I went for a cute witchy design. I loved the silhouettes.
Close-Ups:
The last stamping plate is this Ghost and Skulls Rectangular Plate BP-L057 (item #35742). It had some adorable and spooky designs. I think one of my favorites was the image I used for my next mani.
I thought the little ghost/bat design was so cute, I just had to use it. Since the image had bats, I decided to use a bat design on the rest of my nails. I liked how it looked with the bright lime green neon as my base color.
Close-Ups:
The last items I received for review were these Blue Rhinestones (item #5178), color #15 on the drop-menu. The listing says you get around 20 pieces, I only photographed a few though.
For this next mani, I used the last rectangular plate I showed you and the rhinestones. The rhinestone really tied the whole design together, and I loved the end result of this Haunted House mani.
Close-Ups:
Overall, I had a good experience with all the items. The only difficulty I encountered was when I couldn't pick up the images on the edges of the rectangular plates. But like I said before, I'm sure I just need to practice. I'm not an experienced stamper by any means, so if you aren't either (or you're just beginning) don't get discouraged. Stamping is something you can master with practice and patience. I definitely haven't mastered it yet, but I'm working on it. Hehe.

The only problem was that the items got here later than usual. I'm not sure if it's just because of the craziness of the holiday season and USPS being lame, but the items arrived much later than I expected. Other than that I have no other complaints.

Well I really hope you guys enjoyed the review and manis, I had tons of fun coming up with these designs. If you plan to make a purchase from Born Pretty Store, remember to use my code ANNYW10 to get 10% off any regular priced items.

Before I go, I want to wish you all a blessed 2017; full of laughter, health and happiness.

As always, thank you for stopping by and until next time.
-Ana

Products Used:
Black Creme Polish: Serendipity Nail Polish "Building My Empire"
Dark Red Creme Polish: Serendipity Nail Polish "Less Whine, More Wine!"
Orange Creme Polish: Covergirl "#ElectroGlow"
Yellow Creme Polish: Covergirl "#GetGlowing"
Purple Shimmer Polish: OPI "I Carol About You"
Charcoal Holo Polish: Serendipity Nail Polish "CE0,000,000"
Lime Green Neon Flakie Polish: Love, Angeline "Apple Blossom"
Neon Orange Polish: Love, Angeline "Mac-N-Tosh"
Green Flakie Polish: Supernatural Lacquer "Avalon 2.0"
Light Gray Flakie Polish: Supernatural Lacquer "Calliope"
Dark Blue Flakie Polish: Glam Polish "Night of the Living Dummy"
Brown Micro-Glitter Polish: Creative Cuticles Nail Polish "Pumpkin Spice"
Black Stamping Polish: Born Pretty Store item #18135
White Stamping Polish: Born Pretty Store item #18136
Top Coat: LACC Beauty "2013 Top Coat"
Clear Jelly Stamper: Born Pretty Store item #26498
Lime Green Star Stud: Born Pretty Store item #14438

*Stamping Plates and Rhinestones I reviewed in this post were Press Samples. Serendipity Nail Polish "Building My Empire", "Less Whine, More Wine!", "CE0,000,000"; Love, Angeline "Apple Blossom", "Mac-N-Tosh"; Glam Polish "Night of the Living Dummy"; LACC Beauty "2013 Top Coat" were all giveaway prizes. Creative Cuticles Nail Polish "Pumpkin Spice"; Born Pretty Store Black Stamping Polish, White Stamping Polish, Clear Jelly Stamper were past Press Samples.

Wednesday, October 26, 2016

Tee's Birthday Collab

 Purchased By Me / Giveaway Prize / Press Sample 

Woohoo! Happy Birthday Tee! I hope you have a special time with your loved ones.

So guys, if you didn't already know, today is Tee's birthday. To celebrate, Dianna brought some of us ladies together to do some recreations of Tee's wonderful manis. Check out the collage Dianna put together, it came out great!
Collage by Dianna:
I decided to recreate the mani I've linked here. I thought I had very similar polishes to the ones she used, so I really excited to give it a try. Unfortunately, my polishes were more on the pastel/sheer side. They were pretty much similar in color, but they weren't opaque enough to achieve the same look. Anyways, I just hope she likes my recreation. By the way, if you don't follow her you definitely should because she always does amazing manis.

Okay, so I started off by painting my ring finger and pinky white as my gradient base. My index and middle finger were a simple blue. When the white polish dried, I added a coat of top coat since I was going to be using nail vinyls. Once dry, I added the vinyl as well as some clean-up product around my fingers. Then, I proceeded to apply polish to the sponge and dabbed it on my nail to create my gradient. Once I was mostly happy with it, I removed the vinyl while the polish was still wet. I let my nails dry and then added top coat to all my nails.
Close-Ups:
Overall, the mani came out alright. I just wish I had known my polishes weren't as opaque so I could've picked another mani. Anyways, don't forget to wish Tee a Happy Birthday. If you'd like to see everyone else's recreations, look under the hashtag #ItsTeesBday on Instagram.

Well thank you for stopping by, I hope you all liked the mani. Until next time.
-Ana

Products Used:
White: Sinful Colors "Snow Me White"
Blue: Sinful Colors "Keira Blu"
Pink: Sinful Colors "Cherry Blossom"
Teal: Sinful Colors "Sky Tree"
Top Coat: Love, Angeline "Topped With Love"
Vinyls: Twinkled T Almaz Stencils

*Twinkled T Almaz Stencils were a giveaway prize. Love, Angeline "Topped With Love" was a Press Sample.

Wednesday, October 19, 2016

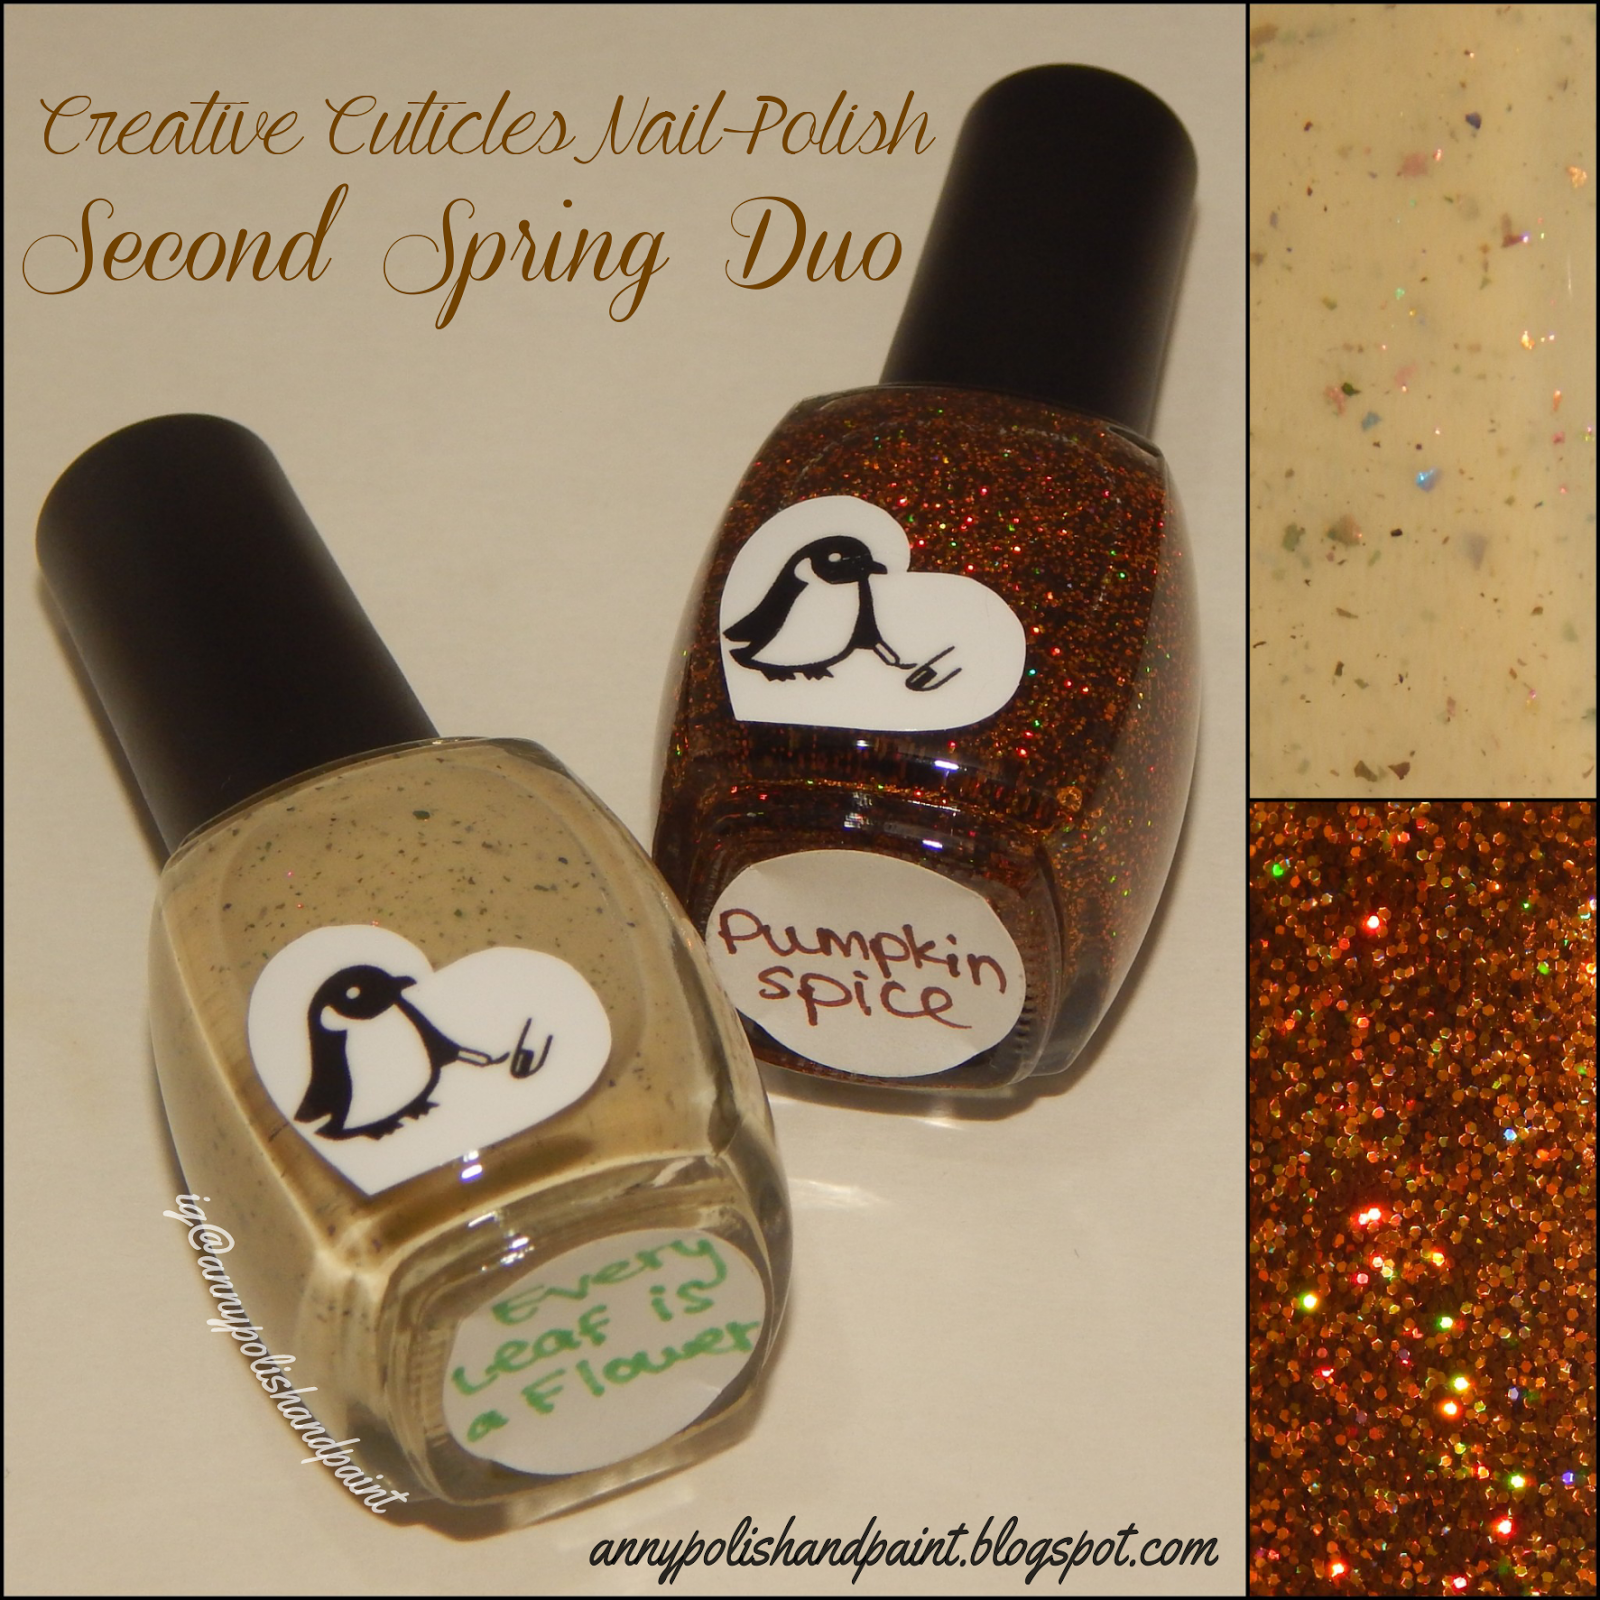
Creative Cuticles Nail Polish: Second Spring Duo

 Press Sample / Giveaway Prize 

Hi guys! I'm so excited because today I'll be showing you the new Second Spring Duo by Creative Cuticles Nail Polish. The duo consists of a crelly and a micro glitter, it will be available for purchase on October 21st at around 7am or 8am EST. So set a reminder if you don't want to miss out.
Okay, now let's get to the swatches.

First up is Every Leaf is a Flower, a pretty and classy nude crelly with blue/green/purple/bronze flakies. It was actually described as a jelly, but seemed more like a crelly to me. The formula was great and it didn't take long to dry. My swatches show 3 coats plus top coat/matte top coat.
3 coats plus top coat/matte top coat on ring finger:
Glossy Close-Up:
Matte Close-Up:
Next we have Pumpkin Spice, a super sparkly and gorgeous full coverage brown/holo copper micro glitter. It reminded me of a shiny penny when I was wearing it, hehe. So, the formula on this one was pretty good as well and dried quite quickly. When brushing on the polish, I noticed that it covered my nail evenly and didn't leave many bald spots. I applied the micro glitter layer by layer, but I'd recommend sponging it on for faster application. It really depends on what you prefer though. My swatches show 3 coats plus top coat/matte top coat, although I would've been okay with 2 coats. Again, it depends on the look you're going for, I just wanted to make sure it was fully opaque.
3 coats plus top coat/matte top coat on ring finger:
Glossy Close-Up:
Matte Close-Up:
Aren't they beautiful? They're just perfect for Fall.

Oh, and I decided to do a mani using the duo. It was a simple but very cute mani in my opinion, although it did look much better in real life.
Close-Up:
Well I hope you guys enjoyed the swatches and review of the duo. Once again, the Second Spring Duo will be available for purchase on October 21st in Kayla's shop at around 7am or 8am EST. The polishes will be listed individually, but if you purchase both you can get a discount using the code AUTUMN. I've listed her shop and social media accounts below in case you'd like to follow her and stay up to date with her releases/sales/etc.

Creative Cuticles Nail Polish (Kayla): Shop - Instagram - Facebook - Facebook Group

Thank you for stopping by and until next time.
-Ana

Products Used:
Top Coat: Love, Angeline "Topped With Love"
Matte Top Coat: Wet N Wild "Matte Top Coat"
Single Chevron Vinyls: Unknown

*Creative Cuticles Nail Polish "Second Spring Duo" was a Press Sample. Single Chevron Vinyls were a giveaway prize; Love, Angeline "Topped With Love" was a Press Sample.

Friday, October 14, 2016

First Day of Fall Mani

 Purchased By Me / Press Sample 

Hi guys! Today I'm showing you the mani I did to welcome Fall. Some of you may have seen a short video I posted on Instagram, well here are the official pictures. I hope you guys love this mani as much as I did.
Close-Ups:
I started off with a beige background on my index, middle finger and pinky. My sister actually let me borrow the beige polish, and now I think I have to get it myself because it's a great color, so beautiful. Anyways, on my ring finger I sponged on a glitter polish. Going back to my other nails, I chose to use a leaf image from Born Pretty Store plate BP-19 (item #17264). I picked up the image and filled in the leaves with some gorgeous fall colored holo polishes. Once I finished painting them in, I let them dry a bit and then went ahead and stamped the image on my nail. I did this for all of the beige nails. I actually did both of my hands like this which I rarely do, I just loved it so much. The last thing to do was top coat. These took me quite a while to finish, but the end result was definitely worth it.
I hope you enjoyed this post. Thanks for stopping by, until next time.
-Ana

Products Used:
Beige: Revlon "Bare Bones"
Golden Yellow Holo: Fancy Gloss "Gingerbread Latte"
Burnt Orange Holo: Fancy Gloss "Pumpkin Spice"
Dark Red Holo: Fancy Gloss "Red Velvet Mocha"
Glitter Polish: Daily Hues Nail Lacquer "#15 Sept./Oct. 2015"
Top Coat: Love, Angeline "Topped With Love"
Black Stamping Polish: Born Pretty Store item #18135
Leaves Theme Stamping Plate: Born Pretty Store item #17264

*Love, Angeline "Topped With Love"; Born Pretty Store Black Stamping Polish and Leaves Theme Stamping Plate were Press Samples.

Wednesday, April 13, 2016

The Polished Bookworms: March 2016

 Purchased By Me / Giveaway Prize / Press Sample 

Hi guys, I hope you're all doing well. Today I have another TPB mani to share with you. The book chosen for March was The Utterly Uninteresting & Unadventurous Tales of Fred, The Vampire Accountant by Drew Hayes. I was inspired by Krystal dressing up like a devil for the high school reunion. Unfortunately, I didn't enjoy the book like I thought I would. I'm not sure if it was because I listened to the audiobook instead of reading it myself, but my library didn't have a copy of it. Fred was a bit annoying though, lol, but that's just my opinion. Well, anyways let's get to the mani.
I started off with black as my base color on my index and pinky, a reddish-black jelly on my ring finger, and a red glitter polish on my middle finger. Afterwards, I began to paint a devil tail on my pinky, first with white acrylic paint and then with red. I did the same thing for the pitchfork, the only problem was that the middle part was supposed to be longer than the sides but I forgot and noticed after I had already top coated. So yeah, lol. With black paint I outlined my ring nail and added criss-cross lines, then added the lips charm. For my glitter nail, I just sponged on the red glitter all over the nail and added one coat of the black/gray glitter, plus a rhinestone to add a bit more to the look.
Close-Up:
So what do you think? I wasn't happy with this mani, but I hope you guys like it.

Thanks for stopping by, until next time.
-Ana

Products Used:
Black: Wet N Wild "Black Creme"
Red Glitter: Wet N Wild "Make Them Boys Go Loco"
Silver/Gray Glitter: Wet N Wild "Black Metal Magic"

Reddish-Black Jelly: Wet N Wild "Under Your Spell"
Top Coat: Love, Angeline "Topped With Love"
Lips Charm: Simply Charmed Nail Art Pucker Up Charm
Rhinestone: Born Pretty Store item #21303

*Wet N Wild "Make Them Boys Go Loco" and Simply Charmed Nail Art Pucker Up Charm were giveaway prizes; Love, Angeline "Topped With Love" was a Press Sample.

Thursday, March 31, 2016

A Weekly Dose of Rainbows: Rainbow Mermaid

 Purchased By Me / Giveaway Prize / Press Sample 

Happy Thursday guys! So today's theme for A Weekly Dose of Rainbows was one I definitely couldn't pass up. Rainbow Mermaid! I think I could've done a better mani, but I still like how it came out.
I started off with a dark blue-green as my base color for my index, middle and pinky; and on my ring finger I went with an amazing glitter filled blue jelly polish. Since I was going to use vinyls, I added a layer of top coat on my index and middle finger and let it dry completely. Once dry, I added the vinyl and then a coat of Avalon 2.0 over that. Then I took off the vinyl while the polish was still wet. I decided to sponge on some flakies on my pinky, and I added some loose glitter on top while the polish was still tacky. When everything dried I added the final layer of top coat, and then completed the look by placing the studs and rhinestones on my nails. I was very excited to finally use some of the beach-y studs I had on hand.
Close-Ups:
So what do you guys think? I really hope you like it. Remember you can use my code ANNYW10 for 10% off your Born Pretty Store purchase.

Well thanks for stopping by, until next time.
-Ana

Products Used:
Dark Blue-Green: Sinful Colors "Calypso"
Green Jelly: Supernatural Lacquer "Avalon 2.0"
Blue Jelly: Reverie Nail Lacquer "Tide Pools"
Green Flakies: KB Shimmer "She's Beyond Kelp"
Blue Flakies: KB Shimmer "Moody Hues"
Top Coat: Love, Angeline "Topped With Love"
Vinyls: Twinkled T Mermaid Stencils
Starfish Charm: Simply Charmed Nail Art Gilded Starfish
Seahorse Charm: Born Pretty Store item #22145
Rhinestones: Born Pretty Store item #21303

*Twinkled T Mermaid Stencils; Simply Charmed Nail Art Gilded Starfish; and KB Shimmer's "She's Beyond Kelp" and "Moody Hues" were giveaway prizes. Love, Angeline "Topped With Love" was a Press Sample.

Thursday, March 10, 2016

A Weekly Dose of Rainbows: Rainbow Chevron

 Purchased By Me / Giveaway Prize / Press Sample 

Happy Thursday guys, I hope you're all doing well. Today's theme for A Weekly Dose of Rainbows is Rainbow Chevron. I hope you like what I came up with.
I started off with a white base, and while that dried I prepared my acrylic paints. I watered down the 4 different paints quite a bit, when the white polish was dry I began to apply the paints in random patterns with a brush. I did swirl them around a bit so they would mix and it gave it a pretty cool look. Once the paint dried I added a layer of top coat because I was going to use vinyls. I applied the vinyls and sponged on black polish over them, then I removed the vinyls off while the polish was still wet. I let my nails dry for a bit before applying the last layer of top coat. Unfortunately, I don't think I waited enough because I smeared the polish a bit.
Close-Ups:
I like how the design came out, and it was fun to do. If you decide to give this look a try, remember to use my hashtag on Instagram so I can see it, it's #annypolishandpaint.

Thanks for stopping by, until next time.
-Ana

Products Used:
White: Sinful Colors "Snow Me White"
Black: Wet N Wild "Black Creme"
Top Coat: Love, Angeline "Topped With Love"
Vinyls: Unknown

*Vinyls were a giveaway prize; Love, Angeline "Topped With Love" was a Press Sample.