Showing posts with label ManiComparison. Show all posts

Sunday, March 8, 2015

Inspired Nail Art

Hi everyone! Today I have a mani inspired by @sarahmcgphoto on Instagram. She did a lip art inspired by Bettlejuice, which inspired me to do these. I really liked the design she did, and I automatically wanted to try it out. She has some amazing work, so I recommend you check her page out.
To begin, I painted on 2 coats of Wet N Wild "French White Creme", and did the rest in acrylic paints. I painted on the stripes with black paint, and cleaned up the sides with white paint. After adding a coat of top coat, I went ahead and painted the green drips. The reason I added the top coat between the stripes and the drips, was in case I made a mistake. I didn't want to risk messing up the design. I added the white highlights on the drips and let them dry. To finish off, I added the final top coat.
Glossy Top Coat:
Matte Top Coat:
Glossy Top Coat:
Matte Top Coat:
Well the end result came out ok. I wasn't completely in love with these, I believe I could've done a better job to be honest. That being said, I might have to re-do these again in the future.
Mani Comparison:
Thank you for stopping by, I hope you enjoyed this short post. Remember, you can follow me on Instagram and Bloglovin'. Until next time.
-Ana

Acrylic Paints Used:
Apple Barrel White
Apple Barrel Black
Apple Barrel Lime Tree

Friday, January 16, 2015

Night Violet

Hey guys! Today I have a swatch of Avon Nailwear Pro+ "Night Violet". It's a rich dark eggplant purple with some golden shimmer to it, but you can also see some rainbow sparkle in the polish which makes it much more beautiful. I did 2 coats but I think I should have done 3, just because it ended up not being as opaque towards the top (near the cuticle). For each coat, I waited around 5 minutes for the polish to dry.
Glossy:
Matte:
Glossy:
Matte:
Doesn't it also look wonderful when it's matte? You can still see the shimmer even in that state, which I love. So what's your favorite: Glossy or matte?
Thank you so much for reading everyone, and I hope you enjoyed this short post. Oh, and sorry that some of the pictures came out a bit blurry. Until next time. Bye.

Wednesday, December 31, 2014

First Mani Swap

Hi guys! I hope you've all been enjoying the holidays, no matter what you celebrate. Thankfully, my family and I had a lovely Christmas, we spent it with family members at our house. If you celebrated, I hope it was wonderful.
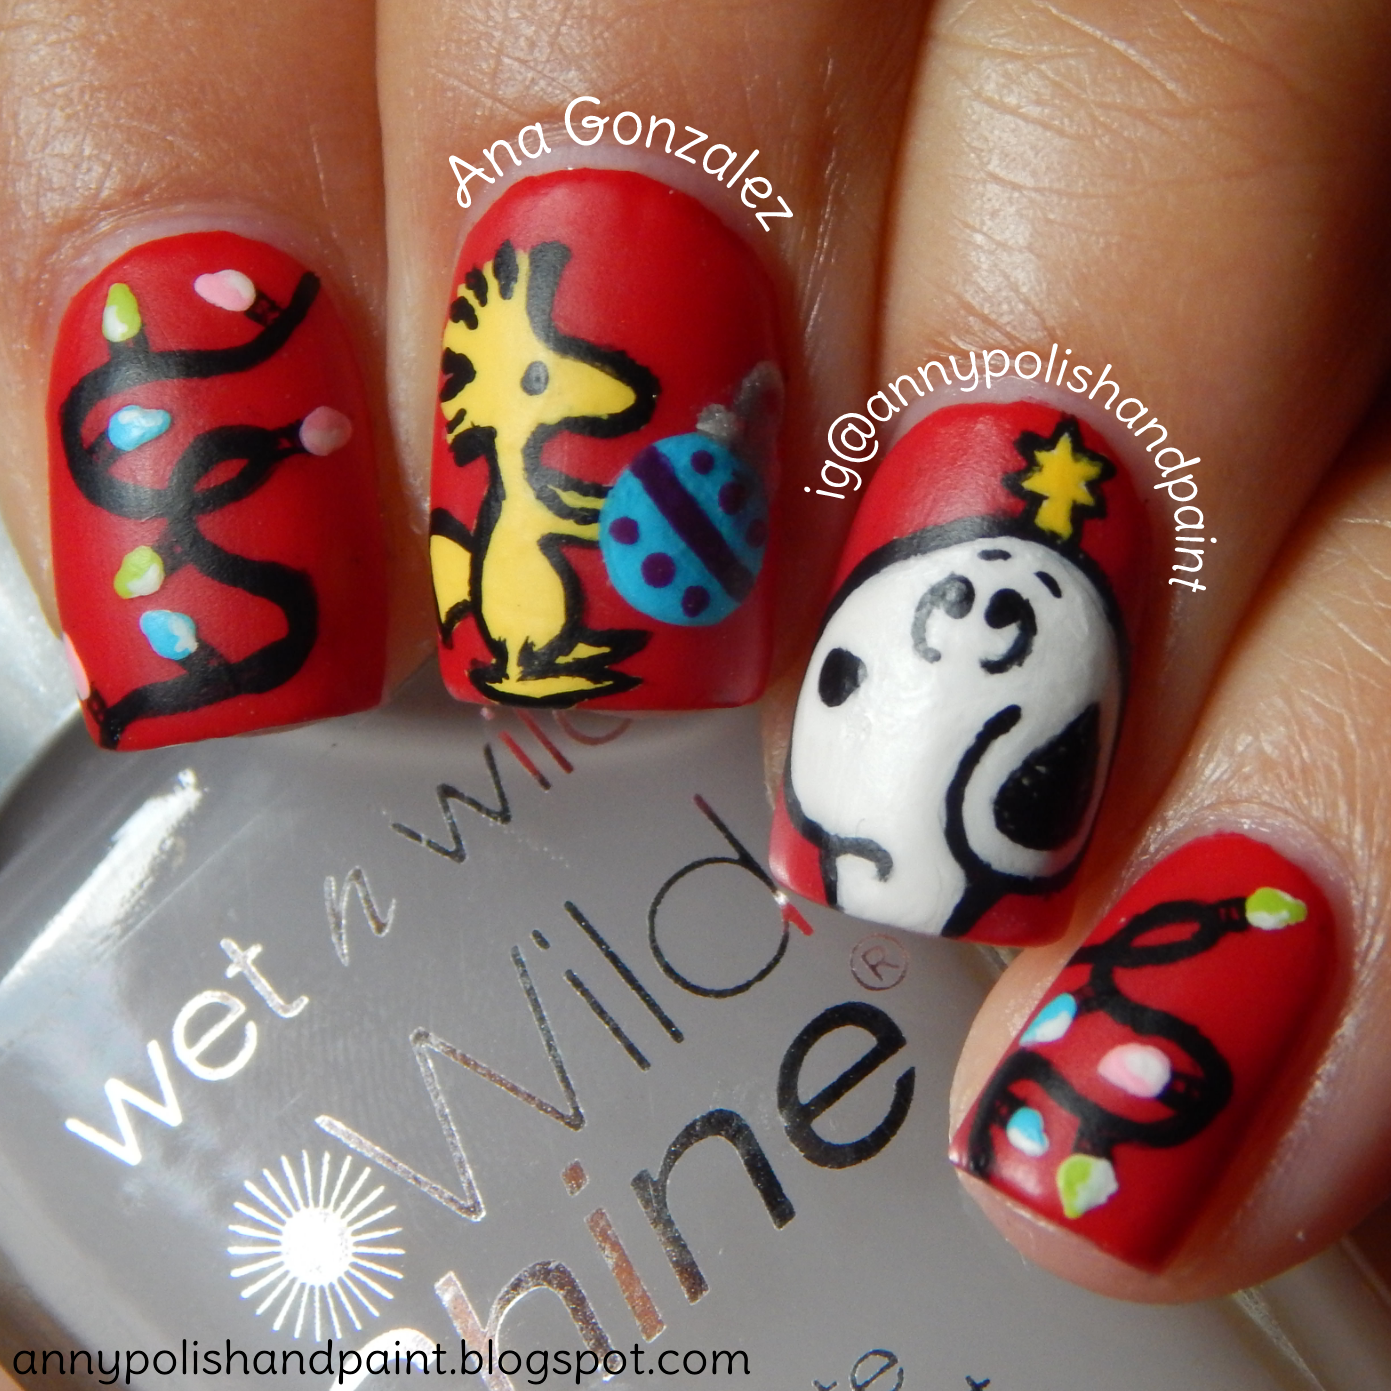
So anyways, I'm so excited for this post because it is the first time I do a mani swap with anyone. Kelly (@devilishdesigns1) was looking for someone to do a mani swap with, so I told her I thought it would be fun and she agreed. So we went ahead and picked out a design from each other, and began. The design of hers that I chose was her Christmas Snoopy design, which she did an amazing job on. I chose that design because I wanted to do a holiday mani. I also decided to challenge myself, that design is a bit more difficult since I had to paint well-known characters. The design did not come out perfect, but it's ok. Kelly chose my Stained Glass mani, which she did a great job on recreating. To get a better look at her Solo Shot, check out her IG page (linked above). She also made the collage for the Mani Swap and it came out great, check it out! Originals are on the right, and the recreations are on the left.
Mani Swap Collage (by Kelly):
Glossy:
Matte:
Glossy:
Matte:
Mani Comparison:
I first put on a coat of my diy glue peel-off base coat, and then I did 2 coats of Seche "Adorned" on each nail. Before I began to paint the characters and lights, I put 1 coat of matte top coat. That just makes it easier to be able to erase your work without ruining your base color, and it's a better surface to work on. Once dried, I painted on the strings of christmas lights on my pointer and pinky. (All the lights, details and characters were done with acrylic paint and a brush.) Then, I moved on to sketching out the characters' shape, first Snoopy and then Woodstock. I started filling in the shapes and perfecting the outlines, as well as adding their faces and other details they each had. I think Woodstock came out better than Snoopy, and I thought it would be the other way around. Lol! I stretched out Snoopy's face (vertically) way too much, other than that, I'm happy with how it all turned out. Oh, and to finish I applied top coat of course.
I know that it might be a bit difficult to do the design because it's more intricate, but I tried explaining it as best as I could. I know it'd be better if you could see step-by-step, and I'm sorry I can't show you. But I hope the steps can help those who would like to try out the design for themselves.
Thank you guys for taking the time to read this post, and I hope you have a lovely New Years Eve. Here's to a year full of happiness, love, health, family and new manis. Hehe. Until next time everyone, be safe. Bye.
-❤- Ana

Top Coats Used:
Glossy: Wet N Wild (Wild Shine) "Clear Nail Protector"
Matte: Wet N Wild (Wild Shine) "Matte Top Coat"
Acrylic Paints Used:
Apple Barrel Black
Apple Barrel White
Apple Barrel Pink Parfait
Apple Barrel Lime Tree
Craftsmart Pool Blue
Craftsmart Plum
Folk Art Silver Sterling

Sunday, December 14, 2014

Snowflakes and Candy Canes

Hi everyone! Today I bring you my first official holiday mani of 2014. I knew I had to use L'oreal "Pop the Bubbles" from my last post because it's so Christmas-y. I fell in love with the end result.
With Top Coat:
I began with 2 coats of "Pop the Bubbles" on my pointer, middle and pinky. On my thumb and ring finger I did 2 coats of Bonita Colors "Spice It Up". After everything dried, I applied striping tape on my thumb and ring finger to create the candy cane pattern. Once I had all the striping tape in place, I added one coat of "Pop the Bubbles" over each of the nails (thumb and ring) and removed the tape right after. I did these one at a time by the way. On my middle finger I painted a snowflake in the middle of the nail with white acrylic paint and paintbrush, I also brushed on a bit of "Spice It Up" around the snowflake. On my pointer and pinky, I painted some random stars and added 'falling snow' with a dotting tool and toothpick. I let everything dry and added top coat.
Matte Top Coat:
Below is a mani comparison, glossy on top and matte on bottom. Although you can hardly tell, but you can see the glossy version does show some sparkle. Honestly, my matte top coat has seen better days you guys. You can see the difference in my last post where I swatched "Pop the Bubbles", it was working much better than it did this time. Also, my sister surprised me with a new bottle of matte top coat recently because I was running out, so yay for awesome sisters. Lol!
Well thanks for reading everyone, I hope you enjoyed this post. If you decide to recreate this or any of my other manis, remember to tag me on Instagram and/or use the hashtag in my bio so I can see your recreations. If you haven't followed me and would like to, click here. I hope you all have a lovely day, and until next time.

Top Coats Used:
Glossy: Wet N Wild "Clear Nail Protector"
Matte: Wet N Wild "Matte Top Coat"

Sunday, October 12, 2014

Day 4: Candy Corn

Today I bring you Candy Corn nails. I had done a different design for this theme, but changed my mind. I used the mani I did for the next challenge, and did a new mani for this challenge. I knew what I wanted to do on my accent nails, but had no idea how to decorate the rest. I thought about doing three different sized dots, from largest to smallest down the nails. Each dot was going to be a candy corn color. But instead, I did little candy corns out of dots. I think it could have turned out better, but it's ok. They don't look bad, and I hope you guys like them. Well, on to the pictures.
Glossy Top Coat:
Matte Top Coat:
Glossy:
Matte:
Glossy:
Matte:
Glossy Vs. Matte:

I first painted my thumb and ring finger black, and the rest a gorgeous shimmery brown color. (My base colors were polish by the way, and the candies were all painted with acrylic paints) I then began painting the triangles on the black nails with a toothpick. I did 2 coats of the white paint so the colors would stand out. While that dried, I did the "dotted" candy corns? I don't know what to call them, lol! I did 3 yellow dots on the top, 2 orange dots in the middle, and 1 white dot at the bottom to complete the candy corn. After, I went back to finish the other candy corns and filled them in with the appropriate colors. Once everything was dry, I finished off with a top coat.

Overall, they came out ok in my opinion. I especially liked the black nails full of candy corns. I did like the idea I got of making the candy corns out of dots, but think I could have made them look better in a different design. Well thanks for reading loves, have a nice one.

Polishes Used:
Black: Wet N Wild (Wild Shine) "Black Creme"
Brown: NY&C "Saturn Sunset"
Glossy Top Coat: Wet N Wild (Wild Shine) "Clear Nail Protector"
Matte Top Coat: Wet N Wild (Wild Shine) "Matte Top Coat"

Acrylic Paints Used:
Apple Barrel "Black"
Apple Barrel "White"
Apple Barrel "Bright Yellow"
Craftsmart "Light Orange"

Monday, September 29, 2014

Geometric Pumpkin Stained Glass

Hi loves! I recently did some nail art for a contest, and it feels like it's been forever. Well the theme for the contest is "Geometric", and days before I actually did my nails, I started to think about what I could do. I had the idea of making it Halloween/Fall related, but turning it geometric. So I decided to just do an accent nail with a geometric looking pumpkin, and I paired it with "Cut Out Nails" or a "Stained Glass" look. I fell in love with how they turned out.

Matte Top Coat

Glossy Top Coat
Matte
Glossy
Glossy Vs. Matte Comparison


I started off with using a layer of my diy glue peel-off base, and I painted on one coat of the Sinful Colors "Glow in the Dark" on my nails. From there on, I used acrylic paints for the whole design. I began with painting out the basic shape for the pumpkin, and filling it in in layers until opaque. Then I outlined all around my nails, and made random lines to create different shapes to make the stained glass effect. Afterwards, I filled in some of the shapes with the orange, purple and green acrylic paints twice. I also did this on the accent nail around the pumpkin. Lastly, I went in again with the black acrylic paint to outline everything to give it a cleaner look. And, I used a top coat to seal in the design. (Since I used the glow in the dark polish, they did glow. Unfortunately, I couldn't capture it with my camera.)

Acrylic Paints Used:
Apple Barrel "Black"
Apple Barrel "Melted Chocolate"
Apple Barrel "Lime Tree"
Apple Barrel "Jack-o-lantern"
Craftsmart "Plum"

Top Coats Used:
Wet N Wild (Wild Shine) "Matte Top Coat"
Sinful Colors "Clear Coat"

Monday, September 15, 2014

Bonita Colors and Beauty Concepts

Hey guys, I have some swatches for you. If you follow me on Instagram, you probably know I purchased some polishes at the 99 cents only store, all Bonita Colors. My very first Bonita Colors! The Beauty Concepts polish was a gift for my Birthday from my sister, which she got at the Dollar Tree (also my first of the brand). I told some of you she purchased it at Walmart, but apparently I was mistaken, so I apologize for the confusion.

So, here are the pictures of the polishes:
Top Pictures, Left to Right:
"Forever And A Day", "Kiss And Tell", "Hydrangeas Are My Fav", "Ocean's Eleven", and "Lucky Penny"
Bottom Pictures, Left to Right:
Unnamed polish, "Smashin' Fashion", and "Spice It Up"

And here are the swatches.

Left to Right:
Bonita Colors "Ocean's Eleven" (1 coat)
Bonita Colors "Kiss And Tell" (2 coats)
Bonita Colors "Smashin' Fashion" (2 coats)
Bonita Colors "Hydrangeas Are My Fav" (1 coat)

Glossy Top Coat:
 Matte Top Coat:

Left to Right:
Bonita Colors "Lucky Penny" (2 coats)
Bonita Colors "Forever And A Day" (2 coats)
Bonita Colors "Spice It Up" (2 coats)
Unnamed polish by Beauty Concepts (2 coats)

Glossy Top Coat:
 Matte Top Coat:

All of the polishes went on easily, I didn't have any problem with the formula or anything. Some of these polishes were actually okay with 1 coat which was great. For example, "Ocean's Eleven" and "Hydrangeas Are My Fav" were opaque with just 1 coat. I love all the colors, and I finally have a really good glitter polish ("Spice It Up").

Oh, and of course I had to see them Matte, aren't they gorgeous?

Thanks for reading, and I hope you enjoyed the post.

Top Coats Used:
Wet N Wild (Wild Shine) "Clear Nail Protector"
Wet N Wild (Wild Shine) "Matte Top Coat"

Sunday, August 31, 2014

Bestie Twin Nails with Emily!

I was contacted some time ago by Emily (@blueemster on IG), asking me if I'd like to do some Bestie Twin Nails with her. First of all, I was super excited because I love her account. She does beautiful swatches, and I couldn't believe she was approaching me to work with her. Total fangirl moment.

She wanted to do Cut Out nails because she had done them before, but she wanted to give them another try. I was happy with the suggestion because I'd been wanting to try out the design myself, for quite some time actually. We wanted them to have a kind of stained glass look, so we started talking about colors and the design for the other nails. She came up with the idea of having 2 of our nails all black with a dot of the lighter color towards the top of the nail. The colors we chose were Sea Green (her favorite color) and Blue (my favorite color). I picked a shade of blue that would go best with the Sea Green, and I think the choice was great. The end result was amazing.

Oh, and if you guys aren't following her yet, you totally should. Or at least check out her page and give her some love. She's super nice and talented, it was an honor doing these with her.

Here's the collage that Emily did of our manis, it's so cute.

Here are the Solo Shots of my mani, and the comparisons.
Glossy Top Coat:
 Matte Top Coat:
Matte Vs. Glossy Comparison:

I started out by making random lines on the nails for the Cut Out nail design. I painted on different sized triangles, and other shapes. I used black acrylic paint to do the lines, and I also used acrylic paint to color in the spaces. I left some of the spaces blank, trying to do it as random as possible. After I painted in the sea green and blue shapes twice (for opacity), I went over the lines again with the black acrylic paint to give it a cleaner look. On my index and pinky, I did 2 coats of the black polish, and added a dot of the sea green acrylic paint towards the top. Once everything was dry, I added Top Coat and I was done. If you have any questions, please leave them below and I'll try to get back to you as soon as I can. Or for a faster reply, you can leave a comment on my Instagram.

Thanks for taking the time to read this, I hope you enjoyed it.
Have a wonderful day!

Polishes Used:
Wet N Wild (Wild Shine) "Black Creme"
Wet N Wild (Wild Shine) "Clear Nail Protector"
Wet N Wild (Wild Shine) "Matte Top Coat"

Acrylic Paints Used:
Black: Apple Barrel "Black"
Sea Green: Craftsmart "Ocean Breeze"
Blue: Craftsmart "Deep Periwinkle"