Showing posts with label SoloShot. Show all posts

Wednesday, December 31, 2014

First Mani Swap

Hi guys! I hope you've all been enjoying the holidays, no matter what you celebrate. Thankfully, my family and I had a lovely Christmas, we spent it with family members at our house. If you celebrated, I hope it was wonderful.
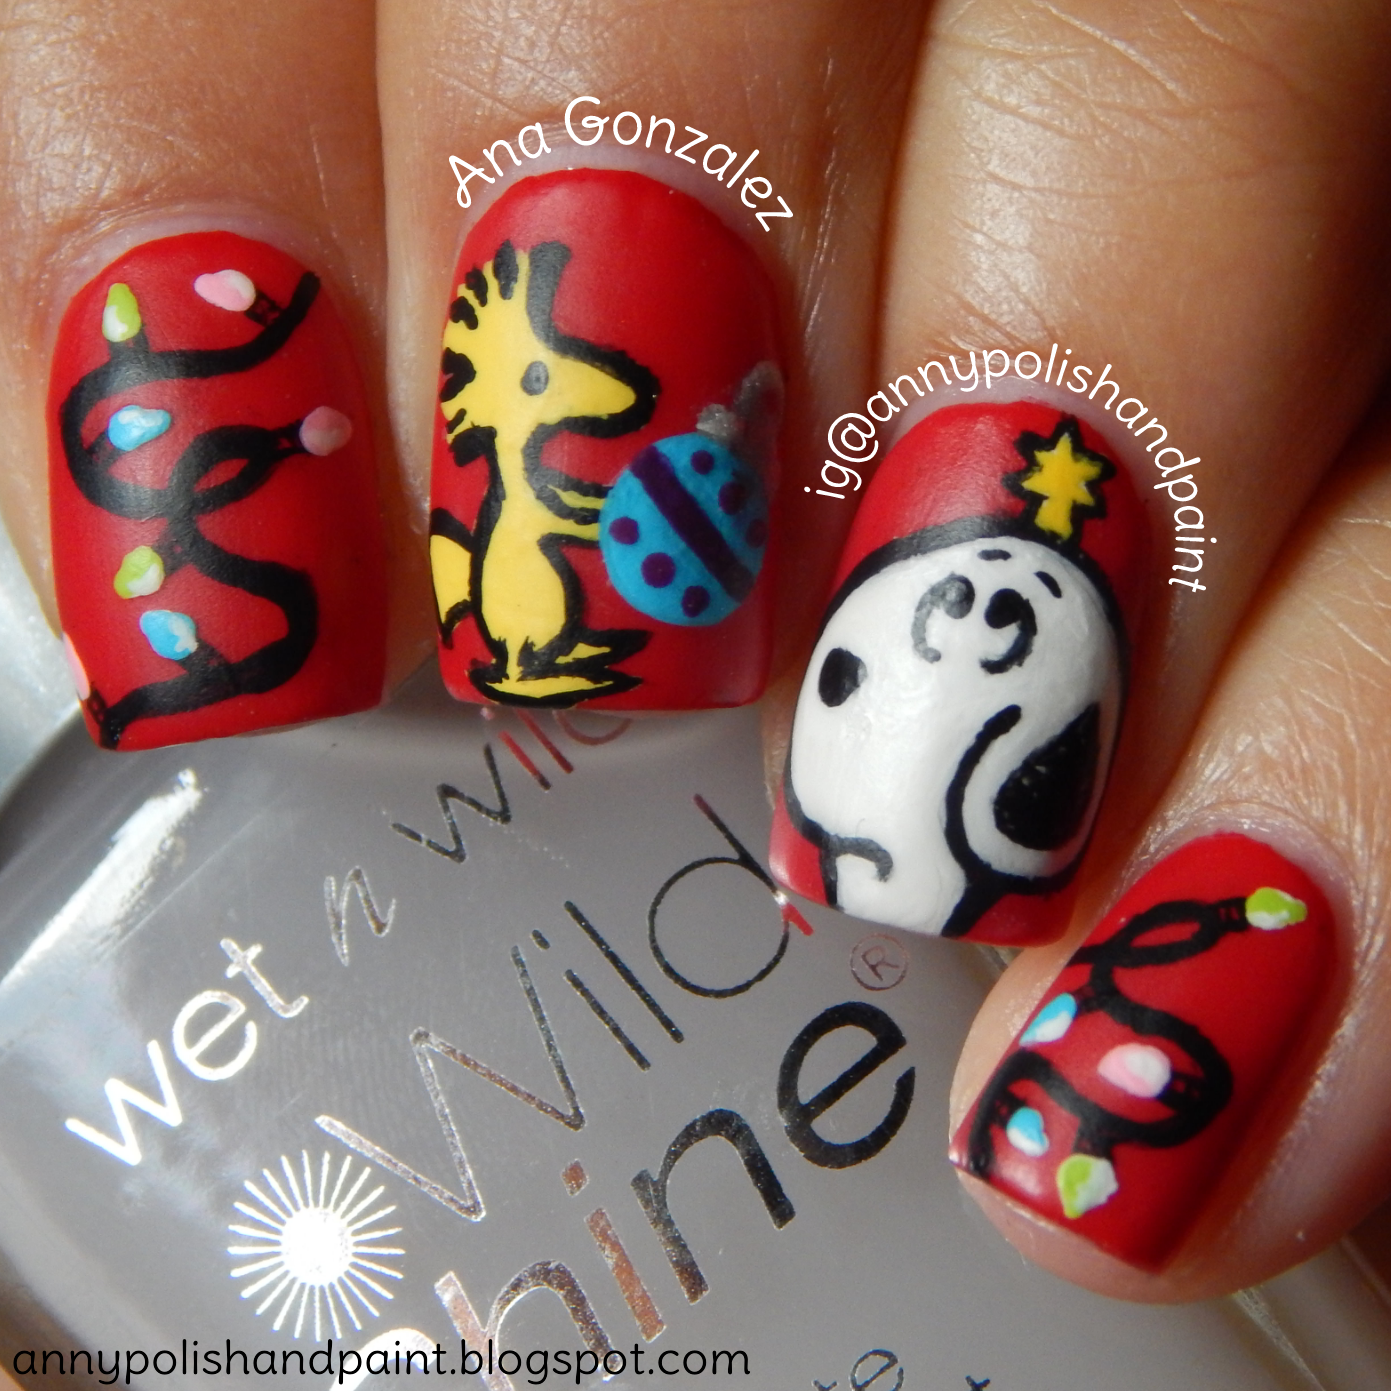
So anyways, I'm so excited for this post because it is the first time I do a mani swap with anyone. Kelly (@devilishdesigns1) was looking for someone to do a mani swap with, so I told her I thought it would be fun and she agreed. So we went ahead and picked out a design from each other, and began. The design of hers that I chose was her Christmas Snoopy design, which she did an amazing job on. I chose that design because I wanted to do a holiday mani. I also decided to challenge myself, that design is a bit more difficult since I had to paint well-known characters. The design did not come out perfect, but it's ok. Kelly chose my Stained Glass mani, which she did a great job on recreating. To get a better look at her Solo Shot, check out her IG page (linked above). She also made the collage for the Mani Swap and it came out great, check it out! Originals are on the right, and the recreations are on the left.
Mani Swap Collage (by Kelly):
Glossy:
Matte:
Glossy:
Matte:
Mani Comparison:
I first put on a coat of my diy glue peel-off base coat, and then I did 2 coats of Seche "Adorned" on each nail. Before I began to paint the characters and lights, I put 1 coat of matte top coat. That just makes it easier to be able to erase your work without ruining your base color, and it's a better surface to work on. Once dried, I painted on the strings of christmas lights on my pointer and pinky. (All the lights, details and characters were done with acrylic paint and a brush.) Then, I moved on to sketching out the characters' shape, first Snoopy and then Woodstock. I started filling in the shapes and perfecting the outlines, as well as adding their faces and other details they each had. I think Woodstock came out better than Snoopy, and I thought it would be the other way around. Lol! I stretched out Snoopy's face (vertically) way too much, other than that, I'm happy with how it all turned out. Oh, and to finish I applied top coat of course.
I know that it might be a bit difficult to do the design because it's more intricate, but I tried explaining it as best as I could. I know it'd be better if you could see step-by-step, and I'm sorry I can't show you. But I hope the steps can help those who would like to try out the design for themselves.
Thank you guys for taking the time to read this post, and I hope you have a lovely New Years Eve. Here's to a year full of happiness, love, health, family and new manis. Hehe. Until next time everyone, be safe. Bye.
-❤- Ana

Top Coats Used:
Glossy: Wet N Wild (Wild Shine) "Clear Nail Protector"
Matte: Wet N Wild (Wild Shine) "Matte Top Coat"
Acrylic Paints Used:
Apple Barrel Black
Apple Barrel White
Apple Barrel Pink Parfait
Apple Barrel Lime Tree
Craftsmart Pool Blue
Craftsmart Plum
Folk Art Silver Sterling

Sunday, August 31, 2014

Bestie Twin Nails with Emily!

I was contacted some time ago by Emily (@blueemster on IG), asking me if I'd like to do some Bestie Twin Nails with her. First of all, I was super excited because I love her account. She does beautiful swatches, and I couldn't believe she was approaching me to work with her. Total fangirl moment.

She wanted to do Cut Out nails because she had done them before, but she wanted to give them another try. I was happy with the suggestion because I'd been wanting to try out the design myself, for quite some time actually. We wanted them to have a kind of stained glass look, so we started talking about colors and the design for the other nails. She came up with the idea of having 2 of our nails all black with a dot of the lighter color towards the top of the nail. The colors we chose were Sea Green (her favorite color) and Blue (my favorite color). I picked a shade of blue that would go best with the Sea Green, and I think the choice was great. The end result was amazing.

Oh, and if you guys aren't following her yet, you totally should. Or at least check out her page and give her some love. She's super nice and talented, it was an honor doing these with her.

Here's the collage that Emily did of our manis, it's so cute.

Here are the Solo Shots of my mani, and the comparisons.
Glossy Top Coat:
 Matte Top Coat:
Matte Vs. Glossy Comparison:

I started out by making random lines on the nails for the Cut Out nail design. I painted on different sized triangles, and other shapes. I used black acrylic paint to do the lines, and I also used acrylic paint to color in the spaces. I left some of the spaces blank, trying to do it as random as possible. After I painted in the sea green and blue shapes twice (for opacity), I went over the lines again with the black acrylic paint to give it a cleaner look. On my index and pinky, I did 2 coats of the black polish, and added a dot of the sea green acrylic paint towards the top. Once everything was dry, I added Top Coat and I was done. If you have any questions, please leave them below and I'll try to get back to you as soon as I can. Or for a faster reply, you can leave a comment on my Instagram.

Thanks for taking the time to read this, I hope you enjoyed it.
Have a wonderful day!

Polishes Used:
Wet N Wild (Wild Shine) "Black Creme"
Wet N Wild (Wild Shine) "Clear Nail Protector"
Wet N Wild (Wild Shine) "Matte Top Coat"

Acrylic Paints Used:
Black: Apple Barrel "Black"
Sea Green: Craftsmart "Ocean Breeze"
Blue: Craftsmart "Deep Periwinkle"