Showing posts with label GlistenAndGlow. Show all posts

Wednesday, December 30, 2015

The Polished Bookworms: November 2015

 Purchased By Me / Giveaway Prize 

Hi guys, I know this post is long overdue. I'm so mad at myself for not keeping up with my TPB posts like I did in the beginning, but hopefully I'll get better at it again this coming year. Anyways, November's book was P.S. I Love You by Cecelia Ahern, and my mani was inspired by the book cover.
I painted on my base color and used acrylic paints for everything else. I added an envelope on my ring finger, and white dots on the rest of my nails. Once the paint dried, I added a coat of top coat. Unfortunately, the top coat left some bubbles behind, which you'll see more clearly on the envelope close-up below.
Close-Up:
The last picture came out very dark and I couldn't fix it, so I'm sorry. Other than that, I hope you liked the mani, I think it came out pretty cute.
With the Book:
Thanks for stopping by and until next time.
-Ana

Polishes Used:
Blue: Wet N Wild "I Need A Refresh-Mint"
Top Coat: Glisten & Glow "HK Girl Glossy Top Coat"

*Glisten & Glow "HK Girl" was a giveaway prize.

Friday, November 20, 2015

A Weekly Dose of Rainbows: Rainbow Fashion

 Purchased By Me / Gift / Giveaway Prize 

Hey guys, I hope you're all doing well. This week's A Weekly Dose of Rainbows theme was Rainbow Fashion, and I had absolutely no idea what I'd be doing. I looked up fashion images on Google and found no inspiration I liked. Then I remembered how much I love the fashion from the show Reign, which is one of my favorite shows. I looked up pictures and there were so many beautiful looks that it was difficult to choose just one. Anyways, I chose a gorgeous gown Adelaide Kane (who plays Mary Queen of Scots) wore for some promotional pictures of the show as inspiration.
Picture from Google:
I started off with gold polish on all my nails as my base color. On my pinky and ring finger I added a nail art water decal from the Born Pretty Store, but I painted half of my pinky with black polish and added some round gold nail studs down the middle. On my index and middle finger I applied some TwinkledT mermaid scale vinyls, after applying top coat of course, and then sponged on some brown polish. I let that dry and added top coat. Afterwards, I put a single chevron vinyl on my index finger and painted the top black. To finish the mani, I added some gold acrylic paint dots in the middle of the scales just like on the dress. My pinky and ring finger represent the skirt of the dress, and my middle and index finger represent the top of the dress.
Glossy:
Matte:
I also had to add matte top coat because I thought it'd look nice.
Glossy:
Matte:
Remember you can use my code ANNYW10 for 10% off your Born Pretty Store purchase if you'd like.
Glossy Close-Ups:
Matte Close-Ups:
Well I hope you all liked this mani. Thank you for stopping by, and until next time everyone.
-Ana

Products Used:
Gold: Elf Nail Polish "Pot of Gold"
Brown: New York and Company "Saturn Sunset"
Black: Wet N Wild "Black Creme"
Glossy Top Coat: Glisten & Glow "HK Girl Glossy Top Coat"
Matte Top Coat: Wet N Wild "Matte Top Coat"
Nail Art Water Decals: Born Pretty Store item ID #20699
Nail Studs: Born Pretty Store item ID #7277
Mermaid Scale Vinyls: Twinkled T
Single Chevron Vinyls: Not known

*New York and Company "Saturn Sunset", Glisten & Glow "HK Girl", Twinkled T mermaid scale vinyls and single chevron vinyls were giveaway prizes

Tuesday, November 17, 2015

The Polished Bookworms: October 2015

 Purchased By Me / Gift / Giveaway Prize 

Hey guys, sorry for the huge delay with this post. I have not finished October's book just yet, but decided to do a mani anyways. I was really enjoying it, but got kind of busy and I stopped reading. October's read was All the Light We Cannot See by Anthony Doerr. I took inspiration from the jewel that was talked about, the Sea of Flames, it was described as a beautiful blue stone with a hint of red at its center.
I started off with a white base to make the colors pop, and did a circular gradient with blue and red polishes over that. Once I was done with the gradient, I sponged on a red glitter jelly polish over the red, and a blue glitter jelly polish over some of the blue. I'm so happy that I did because it ended up looking so much more beautiful. It also gives it more depth. Last thing to do was top coat of course. I love how this came out, and I hope it was worth the wait guys.
Close-Ups:
With the Book:
Thank you for stopping by, and until next time.
-Ana

Polishes Used:
Sinful Colors "Snow Me White"
Sinful Colors "Keira Blu"
Elf Nail Polish "Skinny Jeans"
Elf Nail Polish "Smokin Hot"
Stardust Polish "Angry Angel"
Stardust Polish "Kinda Jazzy"
Glisten & Glow "HK Girl Glossy Top Coat"

*Glisten & Glow "HK Girl" and Stardust Polish "Kinda Jazzy" were giveaway prizes

Thursday, November 12, 2015

A Weekly Dose of Rainbows: Rainbow Fall Foliage & Rainbow Night

 Purchased By Me / Giveaway Prize 

Hi guys! It's time for A Weekly Dose of Rainbows. But this time I have 2 manis since I missed out on last week's theme.

First up we have Rainbow Fall Foliage, which was last week's theme. I began with a white base and put a layer of top coat when it dried. On my index, middle and pinky I did a glitter gradient using "Crushed Leaves" by Pinwheel Polish; appropriately named by the way. It's a milky crelly with fall colored glitter, including: red, orange, yellow, green, gold, copper and dark brown hexagons and squares in various sizes. On my ring finger I painted a tree trunk with acrylic paints and sponged on some "leaves". Unfortunately, the sponge didn't suck up the polish too well, which is why it looks kinda foggy. But that was pretty much my fault, I think I should've changed up the sponge more often.
Holding Pinwheel Polish "Crushed Leaves":
Close-Ups:
Next is Rainbow Night, which is this week's theme. I started off with a white base, and then used "Sea Glass & Surf" by Pinwheel Polish. It's a pretty white crelly with a variety of glitters, including: gold, blue, light blue, lilac, lavender, pastel green and iridescent hexagons and squares in many sizes. Over that I painted a moon and some stars with metallic acrylic paints. I mixed gray, silver, purple glitter and gold glitter paint for the moon. For the stars I mixed gold and gold glitter paint, and I also decided to add some copper dots as an extra. I love how this mani came out, and it was so fun to do.
Holding Pinwheel Polish "Sea Glass & Surf":
Close-Ups:
I hope you guys liked the manis. Thank you so much for stopping by, until next time.
-Ana

Polishes Used:
Sinful Colors "Snow Me White"
Pinwheel Polish "Crushed Leaves"
Pinwheel Polish "Sea Glass & Surf"
LACC Beauty "2013 Top Coat"
Glisten & Glow "HK Girl Glossy Top Coat"

*LACC Beauty "2013 Top Coat" and Glisten & Glow "HK Girl" were giveaway prizes

Tuesday, November 3, 2015

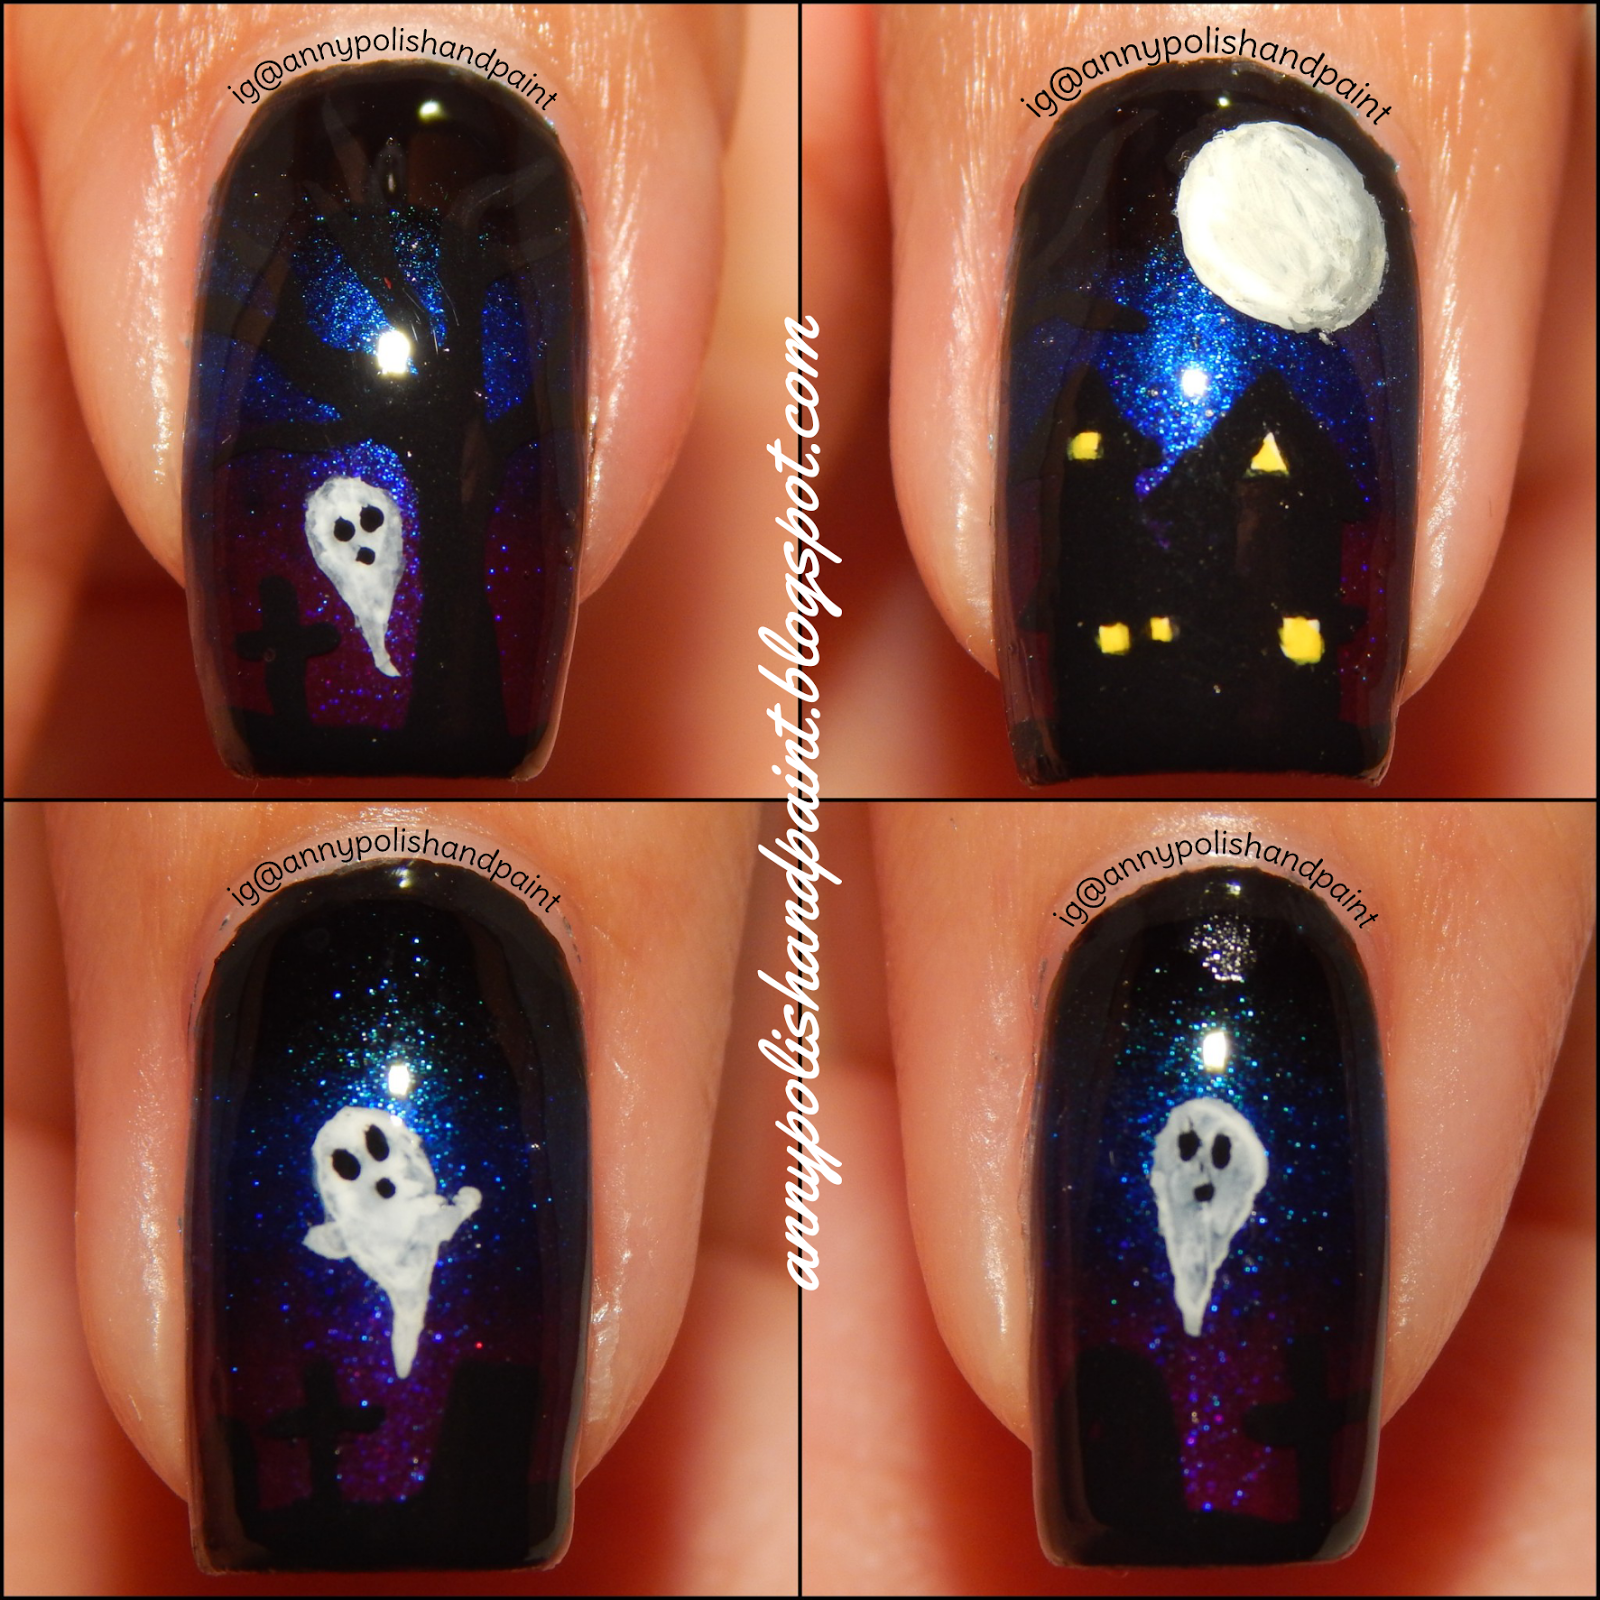
Haunted House & Cemetery Mani

 Purchased By Me / Giveaway Prize 

Hi guys! If you celebrated, I hope you had a safe and fun Halloween. I had a pretty good time handing out candy with my mom. I was most excited about my niece dressing up as Rapunzel and going trick-or-treating though. She looked so adorable!

So here is a Halloween design I did. I was going to post this on Halloween, but it was such a crazy day I wasn't able to. Just so you know, this was not my Halloween mani. Unfortunately, I didn't even have time to paint my nails that day.
 
Anyways, I did a black, blue and purple gradient as my background. Unfortunately, the polishes I used were too dark, which took away from the design. But you can just use lighter colors if you'd like. Well, after top coating, I waited some time and then began to paint the moon and silhouettes with acrylic paint. Once I was happy with everything I finished with top coat.
Close-Ups:
I hope you guys liked this mani, thanks for stopping by and until next time.

-Ana

Polishes Used:
Black: Wet N Wild "Black Creme"
Blue: Wet N Wild "Blue Moon"
Purple: Wet N Wild "Eggplant Frost"
Top Coat: Glisten & Glow "HK Girl Glossy Top Coat"

*Glisten & Glow HK Girl was a giveaway prize

Thursday, October 29, 2015

A Weekly Dose of Rainbows: Rainbow Halloween

 Purchased By Me / Giveaway Prize 

Hi guys! I'm here with another post for A Weekly Dose of Rainbows, and this week's theme was Rainbow Halloween. I honestly wasn't completely in love with what I ended up with, but I hope you guys like it. For this mani I went with a purple, green and orange color palette but I also used black for the stripes. The purple, green and orange nails remind me of crayons or stockings.
It's a simple mani and you only really need some striping tape and polishes of your choice.
Holding Fancy Gloss "Pumpkin Spice":
Close-Ups:
Well I hope you guys liked this look, even though I didn't love it so much. Thank you so much for stopping by, until next time.
-Ana

Polishes Used:
Purple: Daily Hues Nail Lacquer "Cheyenne"
Green: Daily Hues Nail Lacquer "Holly"
Orange: Fancy Gloss "Pumpkin Spice"
Black: Wet N Wild "Black Creme"
Top Coat: Glisten & Glow "HK Girl Glossy Top Coat"

*Glisten & Glow "HK Girl" was a giveaway prize

Thursday, October 22, 2015

A Weekly Dose of Rainbows: Rainbow Fishtail Braid

 Purchased By Me / Giveaway Prize 

Hi guys, today I have the second mani for A Weekly Dose of Rainbows. This week the theme was Rainbow Fishtail Braid. I recently received my LE Fall Trio from Fancy Gloss, and I was so excited to use them. Since they are one coaters, I thought they'd be perfect for this technique. I also really wanted to use these because they are Fall colors, perfect for October.
Aren't these polishes just absolutely amazing!? They're my first Fancy Gloss polishes, and I must say I am extremely impressed because they are all one coaters. I did experience some staining which kind of sucks, but now I know I'll just have to use 2 coats of base coat.
Holding Fancy Gloss "Pumpkin Spice":
So, I was actually nervous to try out this technique because I'd never done it before. I thought it would be very difficult to do, and yup, I was right. Lol. I did struggle with making the stripes straight and even. I honestly wanted to finish as soon as I could because it wasn't my favorite challenge. But, I do think I have to try this again at some point because I'd like to master the technique even though I didn't fully enjoy it. Haha. But we'll see.
Close-Up:
Well, I guess the mani came out decent even though it was my first time trying it out, especially since I struggled with it. What do you guys think? Have you ever tried the Fishtail Braid technique? Let me know in the comments below or on my Instagram. Anyways, I hope you guys enjoyed this post. Thanks so much for stopping by and until next time.
-Ana

Polishes Used:
Sandy Gold Holo: Fancy Gloss "Gingerbread Latte"
Burnt Orange Holo: Fancy Gloss "Pumpkin Spice"
Dark Red Holo: Fancy Gloss "Red Velvet Mocha"
Top Coat: Glisten & Glow "HK Girl Glossy Top Coat"

*Glisten & Glow "HK Girl" was a giveaway prize

Monday, October 19, 2015

"Licorice Whip" Galaxy Mani

 Press Sample / Purchased By Me / Gift / Giveaway Prize 

Hi guys! Just like I promised, here is my galaxy mani post. Like I said on my last post, Melody from Envy Lacquer wanted to host a contest where some of us ladies would create a galaxy mani featuring her polish Licorice Whip as a base. This polish makes a great base for a galaxy mani, but that doesn't mean it can't be worn on its own.

Holding Envy Lacquer "Licorice Whip":
I used many polishes in this mani apart from Licorice Whip. I started off with sponging on a pattern across my nails with white polish, and little by little added the colors over the white. I used a variety of blues, purples and pinks mostly. In order for the colors to blend well and make a nice transition, I had to go over them a few times, kind of like you'd do a gradient. Once I was happy with it I let it dry, and then sponged on a tiny bit of Wet N Wild Kaleidoscope and Black Label NailsFrosty's Mistress over some parts of the galaxy. Frosty's Mistress gave it an iridescent sheen which looked great on the galaxy. Some of the little stars were done with polish, but I finished them off with acrylic paint because the polish was getting stringy, and I also used paint to do the larger stars. To finish off, I added top coat.
Side View:
Close-Ups:
I really like how my galaxy mani came out, I didn't think it would look ok. I'm always a bit nervous when attempting to do a galaxy mani, especially since I only used polishes.
Anyways, I hope you liked the mani. Thanks for stopping by and until next time.
-Ana

Polishes Used:
Envy Lacquer "Licorice Whip"
Sinful Colors "Snow Me White"
Wet N Wild "Kaleidoscope"
Black Label Nails "Frosty's Mistress"
Wet N Wild "Bijou Blue"
Wet N Wild "Blue Moon"
Sinful Colors "Keira Blu"
Lavish Polish "Hydrangeas"
Bonita Colors "Ocean's Eleven"
Lavish Polish "Wisteria"
Lavish Polish "Tulips"
Bonita Colors "Hydrangeas Are My Fav"
Beauty Concepts "No Name"
Charlotte Russe "No Name"
Glisten & Glow "HK Girl Glossy Top Coat"

*Black Label Nails "Frosty's Mistress"; Lavish Polish "Hydrangeas", "Wisteria", "Tulips"; and Glisten & Glow "HK Girl" were all giveaway prizes, Envy Lacquer "Licorice Whip" was sent to me to use on this galaxy mani

Saturday, October 17, 2015

Envy Lacquer "Licorice Whip"

 Press Sample / Purchased By Me / Giveaway Prize 

Hi guys, I hope you're all doing well. I have a swatch to show you of "Licorice Whip" by Envy Lacquer. It was my first time ever trying out this brand and it was a great experience. Not only was the polish beautiful, but it also had a good formula.
So Melody, owner of Envy, wanted some ladies to create galaxy manis using Licorice Whip as a base (I'll be showing you my galaxy mani on my next post). She sent out some minis to a few ladies, and I was among the lucky few. The polish looks pretty fantastic on its own already, but don't take my word for it, just check out the swatches.
Holding Envy Lacquer "Licorice Whip":
2 coats plus top coat:
Licorice Whip is a black jelly polish with holo shards and holo/blue micro glitter. Just beautiful, I did 2 coats on all my nails. It wasn't fully opaque in a few places, so I'd recommend you do 3 coats, or use it over a black base. I used a matte top coat on my ring finger in the next pictures.
2 coats plus top coat/matte top coat on ring finger:
Glossy/Matte Comparison:
Well I hope you guys liked the swatches, and stay tuned for the galaxy mani I did using this pretty polish. Thanks for stopping by, until next time.
-Ana

Top Coats Used:
Glossy: Glisten & Glow "HK Girl Glossy Top Coat"
Matte: Wet N Wild "Matte Top Coat"

*Glisten & Glow "HK Girl" was a giveaway prize, Envy Lacquer "Licorice Whip" was sent to me to use on a galaxy mani

Thursday, October 15, 2015

A Weekly Dose of Rainbows: Rainbow Splatter

 Purchased By Me / Giveaway Prize 

Happy Thursday guys! I hope you're all doing well.

Not so long ago, Amber from Nails Like Lace came up with the idea of creating a group. She usually hosts collaborations all dealing with rainbows and some people have been asking her when she was going to be holding another collab. So, she decided that starting a group with weekly rainbow themes would be a good idea. If you've participated in her rainbow collabs, then you know that you don't necessarily have to use the original colors of the rainbow, you can use pastel colors or even 3+ colors of your choice. They're always so much fun. So the group is called A Weekly Dose of Rainbows. I was excited to hear about this, but didn't know if I'd be able to participate weekly. Amber said there would be no problem if we couldn't do a weekly mani, so I was in. The first theme for A Weekly Dose of Rainbows is Rainbow Splatter.
For my splatter mani, I decided to use some Halloween colors since we're in the month of October. I chose a purple, orange and lime green for the splatter. So, I started off with white as my base color, and added some top coat so the polishes wouldn't bleed or get mixed. Once dry, I started the splatter process. I used the polishes one by one and gave it all some time to dry before I applied the final coat of top coat. Not a difficult technique, but it is very messy. So beware, lol.
Holding Sally Hansen (Complete Salon Manicure) "Hot Lava":
Close-Ups:
Personally, I really liked how it came out. Each polish had some shimmer or holo which made the splatter much more pretty. I hope you guys liked this mani, and I'm looking forward to the next themes. You can join the group if you'd like by the way, I've linked the group page below. Make sure to also follow Amber, she's super nice and has wonderful nail art which I'm sure you'll enjoy.

A Weekly Dose of Rainbows: Facebook Group

Amber (Nails Like Lace): Instagram - Blog - Facebook - Twitter

Well thanks for stopping by, until next time.
-Ana

Polishes Used:
Purple Holo: Daily Hues Nail Lacquer "Cheyenne"
Orange: Sally Hansen (Complete Salon Manicure) "Hot Lava"
Lime Green: Wet N Wild (Fergie) "Glowstick"
White: Sinful Colors "Snow Me White"
Top Coat: Glisten & Glow "HK Girl Glossy Top Coat"

*Glisten & Glow "HK Girl" was a giveaway prize

Saturday, October 10, 2015

Super Nails Lacquer Swatches & Review

 Press Sample / Purchased By Me / Giveaway Prize 

Hi guys! Today I have some swatches and a review on 3 polishes by Super Nails Lacquer. They are all glitter toppers, 2 are from KC's Halloween collection and 1 from her core line.

When using glitter toppers, I highly recommend you turn them upside down before using to allow the larger glitter to go towards the top. That way it'll be much easier to access the bigger glitters. Just a suggestion. Anyways, let's get to the swatches.


First up we have the core line polish called Poker Face. It's a clear base polish full of heart, diamond, club and spade shaped glitter in a variety of colors and finishes. The glitter was a bit difficult to get out since they're bigger, so as always, I recommend you turn the bottle upside down for a while before using it. You'll also need to apply a generous coat of top coat to smooth out the glitters. I thought it was a fun glitter topper, but I do think it'd be a bit better if the glitters were a smaller size like the diamond glitter in the polish. Instead of applying a coat of the polish, I decided to do a glitter placement over a white and black gradient. You can see all the different colored glitters and finishes, including: matte, metallic and holo glitter. So colorful.
Glossy:
Matte:
Glossy/Matte Comparison Close-Up:
Black Cat Crossing is the first of the Halloween polishes. It's a clear base glitter topper with black and silver holo micro glitter, and black holo cat shaped glitter. The formula was great, and turning the bottle upside down made it so much easier to get out the cat glitter. What you see in the pictures is 1 coat over Wet N Wild (Fergie) Glowstick, a few of the cats were individually placed.
Glossy:
Matte:
Glossy/Matte Comparison Close-Up:
Crushed Leaves has got to be my favorite, it's the perfect glitter topper for Fall time. It's a clear base glitter topper with gold, orange and red-orange metallic shards; orange square micro glitter; orange or copper holo hexes; and gold holo circles. I had no trouble with the formula. The circles were a bit tough to come across, so I turned the bottle upside down. 1 coat over Sinful Colors Calypso is what you see in the pictures. Again, some of the circles were placed individually.
Glossy:
Matte:
Glossy/Matte Comparison Close-Up:
It's such a stunning glitter combination. So much that I had to do an additional swatch. In the following pictures you can see I did a sort of glitter gradient with Crushed Leaves over a black base, Wet N Wild Black Creme. I dabbed it on towards the top near my cuticle, and dragged the polish down little by little. I absolutely love it!
Glossy:
Matte:
So which of the 3 is your favorite? I'd definitely recommend the Halloween polishes, the glitter pay-off is great with both, and you just need 1 coat or less to give your mani that something extra. All these polishes are now available in KC's store. If you'd like to stay up to date with new polish releases/sales/giveaways, you should give her a follow. I've linked her store and social medias below.

Super Nails Lacquer: Store - Instagram - Facebook - Tumblr

I hope you all enjoyed this review and the swatches. Thanks for stopping by, and until next time.
-Ana

Polishes Used:
White: Sinful Colors "Snow Me White"
Black: Wet N Wild "Black Creme"
Lime Green: Wet N Wild (Fergie) "Glowstick"
Dark Teal: Sinful Colors "Calypso"

Top Coats Used:
Glossy: Glisten & Glow "HK Girl Glossy Top Coat"
Matte: Wet N Wild "Matte Top Coat"

*Glisten & Glow "HK Girl" was a giveaway prize, Super Nails Lacquer polishes were provided for an honest review