Showing posts with label Glossy. Show all posts

Saturday, October 17, 2015

Envy Lacquer "Licorice Whip"

 Press Sample / Purchased By Me / Giveaway Prize 

Hi guys, I hope you're all doing well. I have a swatch to show you of "Licorice Whip" by Envy Lacquer. It was my first time ever trying out this brand and it was a great experience. Not only was the polish beautiful, but it also had a good formula.
So Melody, owner of Envy, wanted some ladies to create galaxy manis using Licorice Whip as a base (I'll be showing you my galaxy mani on my next post). She sent out some minis to a few ladies, and I was among the lucky few. The polish looks pretty fantastic on its own already, but don't take my word for it, just check out the swatches.
Holding Envy Lacquer "Licorice Whip":
2 coats plus top coat:
Licorice Whip is a black jelly polish with holo shards and holo/blue micro glitter. Just beautiful, I did 2 coats on all my nails. It wasn't fully opaque in a few places, so I'd recommend you do 3 coats, or use it over a black base. I used a matte top coat on my ring finger in the next pictures.
2 coats plus top coat/matte top coat on ring finger:
Glossy/Matte Comparison:
Well I hope you guys liked the swatches, and stay tuned for the galaxy mani I did using this pretty polish. Thanks for stopping by, until next time.
-Ana

Top Coats Used:
Glossy: Glisten & Glow "HK Girl Glossy Top Coat"
Matte: Wet N Wild "Matte Top Coat"

*Glisten & Glow "HK Girl" was a giveaway prize, Envy Lacquer "Licorice Whip" was sent to me to use on a galaxy mani

Wednesday, September 16, 2015

Pretty in Purple & Silver

 Purchased By Me / Gift / Giveaway Prize* 

Hi guys! Today's nail art is full of purples and silver, oh and a bit of holo glitter of course. Hehe.
Well I sat down to do some nail art, but had no real plan or vision of what I was going to do. I pretty much just picked some polishes I thought would look good together, including Sinful Colors Berry Charm which I've been wanting to use, and started to work.
Close-Ups:
I started with a coat of my diy peel off base coat, and then I added my base colors. Berry Charm is so pretty, but I had to be careful with it because it did flood my cuticle a bit. I top coated and waited a good 15-20 minutes before applying my diamonds vinyl, which are from Twinkled T. Once I put my vinyl down, I sponged on a diagonal gradient using Elf Nail Polish W2 and Liquid Metal. On my ring finger I did a glitter gradient with OPI Desperately Seeking Sequins which is super sparkly, over Berry Charm. I kept it simple on my pinky and index finger. Liquid Metal is on my pinky, and W2 on my index with a silver stud from the decoration wheel (item ID #7277) I purchased from the Born Pretty Store. Remember, you can use my code ANNYW10 for 10% off your purchase. All that was left to do was finish with top coat.
Holding OPI "Desperately Seeking Sequins":
I'm really satisfied with the outcome, I think it looks nice.

Well I really hope you liked this design. If you decide to recreate it don't forget to use my hashtag annypolishandpaint on Instagram so I can see, you can also tag me if you'd like. Thank you for stopping by, and until next time.
-Ana

Polishes Used:
Purple Creme: Sinful Colors "Berry Charm"
Purple Shimmer: Elf Nail Polish "W2"
Silver: Elf Nail Polish "Liquid Metal"
Glitter Topper: OPI "Desperately Seeking Sequins"
Top Coat: Glisten & Glow "HK Girl Glossy Top Coat"

*Twinkled T vinyls and OPI Desperately Seeking Sequins were a giveaway prize

Friday, September 11, 2015

Nail Art with "Cheyenne"

 Purchased By Me / Giveaway Prize* 

Hi everyone! Today I have some nail art to show you guys. I decided to do some nail art on the swatch I showed you last time, I hope you like it.

So, I used Cheyenne by Daily Hues Nail Lacquer as my base color. When that dried I added a coat of HK Girl by Glisten & Glow so I could lay down my nail vinyls. I used some single chevron vinyls Beverly (nailedthepolish on Instagram) sent me as part of a giveaway prize, I don't know where she purchased them though. Well, I laid down the vinyls and painted on a coat of Calypso by Sinful Colors, it's a gorgeous dark teal creme polish with a great formula. I was pretty nervous that it'd end up looking bad, but I love how the color combo turned out. Anyways, after that, I decided to go a bit further with the design and do some glitter placement, so I used some gold glitter I purchased from the Dollar Tree. When I finished the glitter placement, I sealed it all in with top coat. On my ring finger, I just added a gold diamond stud from a stud wheel I purchased from the Born Pretty Store.
Close-Ups:
I really like how this mani turned out, it looks kind of royal because of the colors. Not sure if that makes sense, lol. But yeah, that's just my opinion.
Holding Born Pretty Store Stud Wheel:
So what's your favorite thing about this design? Will you be trying it out? If you decide to recreate it, make sure to use my hashtag annypolishandpaint, so I can see your recreation. You can also tag me in the caption or photo.

Well thank you for stopping by. Until next time guys.
-Ana

*HK Girl Top Coat and vinyls were a giveaway prize

Tuesday, September 8, 2015

Daily Hues Nail Lacquer "Cheyenne"

 Purchased By Me / Giveaway Prize* 

Hi guys! I have a swatch for you today. I was able to purchase a polish from Daily Hues Nail Lacquer during her sale a while back, and I'm so happy with it. I added Cheyenne to my wishlist after I saw Cheyenne's (cdbnails143 on Instagram) swatch of it. I knew it would be pretty, but when I finally had it on my nails, I fell in love.
Holding Daily Hues Nail Lacquer "Cheyenne":
Cheyenne is a rich dark purple holo polish. It can easily be a one coater if you apply it carefully, but I chose to do 2 coats. Also, the formula was nice.
2 coats plus top coat/matte top coat on ring finger:
Glossy/Matte Comparison:
Isn't it awesome? I usually don't go for purple polishes, but this one is amazing! I highly recommend it.
Look at all that holo!
Thank you very much for stopping by, I hope you all enjoyed this short post. Until next time.
-Ana

Top Coats Used:
Glossy: Glisten & Glow "HK Girl Top Coat"
Matte: Wet N Wild "Matte Top Coat"

*HK Girl Glossy Top Coat was a giveaway prize

Monday, August 24, 2015

Bestie Twin Nails with Lex

 Purchased By Me / Giveaway Prize* 

Happy Monday guys! Today I have some Bestie Twin Nails to share with you. I was so excited and honored when Lex asked me if I wanted to do some bestie twin nails with her. She's known as lexstasynails on Instagram, and if you don't follow her yet you should. Her designs are freaking amazing, and her work is usually done all freehand which makes it even more awesome. Well anyways, I of course said yes and we began to brainstorm. We decided to do a simple mani with mint green and gray as our colors, and we incorporated chevrons and polka dots. Check out our manis.
Collage was put together by Lex:
I love how both our manis came out. Lex suggested we do them at the same time instead of one of us doing the mani first and the other one of us copying it afterwards. So that's what we did, and they ended up looking pretty similar. The only difference was our polka dots, but I'm still in love with the outcome.
Solo Shot:
To get this look, I started with a base coat and followed with my base colors. Once dry, I added a coat of top coat so I could lay down my vinyls* on my index and ring finger. (The chevron vinyls were part of a giveaway prize, so I don't know where they were purchased.) I added my second color over the vinyls and took them off while the polish was still wet. On my middle finger and pinky I just added polka dots. I finished off with a coat of glossy top coat.
Holding Glisten & Glow "HK Girl Glossy Top Coat":
Close-Ups:
I had a great time collaborating with Lex, so I hope we get the chance to do this again. Well I hope you all enjoyed this post. Thanks for stopping by, until next time.
-Ana

Polishes Used:
Mint: Color Mates "Jaded"
Gray: Avon Nailwear Pro+ "Grey Flash"
Top Coat: Glisten & Glow "HK Girl Glossy Top Coat"*

Friday, August 14, 2015

Summer Wine & Tide Pools

 Purchased By Me / Giveaway Prize* 

Happy Friday guys! I purchased some polishes from Reverie Nail Lacquer, and I have swatches to show you. I finally got Summer Wine, which I've had on my wish list since it was first released. Tide Pools was also on my wish list, but I was most excited about Summer Wine. Lol. So let's get to the swatches.
First up is Summer Wine, a red jelly polish with a variety of glitter, including: pinks/yellow/orange matte hexes, copper/gold metallic hexes, green/blue/pink-orange iridescent hex glitters, and light pink/yellow circle matte glitter. The formula was good, it went on so smoothly. I was so happy to finally get this polish, and it didn't disappoint. It's beautiful!
Holding Reverie Nail Lacquer "Summer Wine":
3 coats plus top coat/matte top coat on ring finger:
Glossy/Matte Comparison:
Tide Pools is a gorgeous glitter-packed dark blue jelly polish with gold shimmer. It has white star glitter, dark green/white/silver/gold/light blue metallic circle glitter, blue iridescent hexes, copper/dark green metallic hexes, and bright blue hexes. There was no need to fish for any glitter. The formula was pretty thick and a bit difficult to work with, but it's totally worth it in my opinion. This one ended up being my favorite of the 2. I just think it's so unique, and the color combination is perfect.
Holding Reverie Nail Lacquer "Tide Pools":
2 coats plus top coat/matte top coat on ring finger:
Glossy/Matte Comparison:
Well I hope you guys enjoyed this post. Thanks for stopping by, and until next time.
-Ana

Top Coats Used:
Glossy: Glisten & Glow "HK Girl Top Coat"*
Matte: Wet N Wild "Matte Top Coat"

Tuesday, August 11, 2015

Pretty Little Liars Nail Art

 Purchased By Me / Gift / Giveaway Prize* 

Happy Tuesday everyone! I don't usually do manis when I watch shows, but I wanted to do one for this episode. If you watch Pretty Little Liars, then you know that we'll soon be finding out who A is. I'm so excited, but nervous to finally get some answers. My sister and I have been trying to come up with a theory on who Charles might be, but we haven't settled on anything solid, so we have no clue. We'll just have to wait for the episode and see what happens.

I was loosely inspired by one of Roselynn's (roselynn787 on Instagram) PLL manis which you can see on her blog, just click here.
Holding Wet N Wild (Fergie) "Make Them Boys Go Loco":
I decided to do a glitter accent on my ring finger over a black base, I used 2 different glitter toppers that have red and black/silver/charcoal glitters. On my index and pinky I did a white base, put a coat of top coat, and then used 2 red polishes to do a "blood spatter". The red polishes look pretty similar, but the elf nail polish was a bit darker. Lastly, I did a black base on my middle finger and added a coat of top coat because I decided to do the "A" with acrylic paint. I sketched out the "A" with white paint first, and then painted over that with red so it would pop. I finished the mani by sealing it all in with a glossy top coat.
I hate how the "blood spatter" on my pinky came out, but other than that, the mani looks ok. So will you be watching tonight? I'm hoping I'll be able to watch it live because I don't want to come across any spoilers. By the way, please try not to leave any spoilers in the comments just in case there are other people who haven't watched it yet.
Close-Up:
Thanks so very much for stopping by, I hope you enjoyed this post. Until next time everyone.
-Ana

Polishes Used:
White: Sinful Colors "Snow Me White"
Black: Wet N Wild "Black Creme"
Red: Bonita Colors "Forever And A Day"
Darker Red: Elf Nail Polish "Smokin Hot"
Black/Silver Glitter: Wet N Wild (Fergie) "Black Metal Magic"*
Red Glitter: Wet N Wild (Fergie) "Make Them Boys Go Loco"*
Top Coat: Glisten & Glow "HK Girl Top Coat"*

Wednesday, August 5, 2015

Guest Post At Nails Like Lace

Hi guys, I hope you're all doing well. Today I have a guest post for Amber over at Nails Like Lace. Amber always does such fun nail designs, and she's super nice. You should give her a follow if you don't yet, you won't be disappointed. Oh, and while visiting her page, you can check out the other guest posts.

So, here's the nail art I did for my guest post. Head on over to her blog to read more about it and see more pictures. Just click here, and it'll take you directly to the blog post.
Thanks for stopping by.
-Ana

Saturday, July 25, 2015

CCNP's Sunshine LE Duo

 Press Sample / Contest Prize 

Hi guys! Today I bring you swatches of the Sunshine Limited Edition Duo from Creative Cuticles Nail Polish. The duo is inspired by the sunrise and sunset. They'll be released on July 30th at 11 AM EST, and there will only be 6 duos available for sale. So if you're interested in purchasing them, you'll have to act fast. Now let's get to the swatches, shall we?
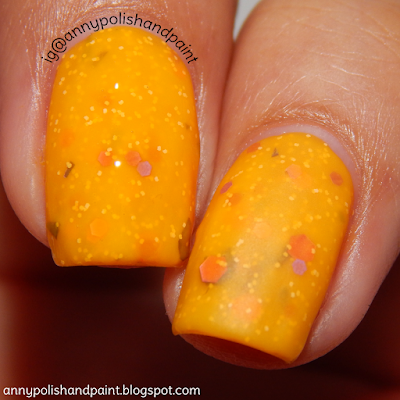
First up is Sunrise, a bright yellow crelly full of a variety of glitter. It has tiny yellow matte glitter, lavender holo shards, rose gold holo hexes, and matte peach/light pink/purple hexes. The larger glitter is a bit tougher to come across, so I'd recommend turning the bottle upside down for a few minutes before using. That way you don't have to fish so much for the glitter. I had no trouble with the formula, it went on nicely. I did 4 coats to make sure it'd be opaque, but I think 3 coats would've been enough, it all depends on preference. By the way, the polish is more yellow in real life than what the pictures show. You don't know how difficult it was to photograph this swatch. I was very frustrated and sad that I couldn't capture the actual color.
Holding Creative Cuticles Nail Polish "Sunrise":
4 coats plus top coat/matte top coat on ring finger:
Glossy/Matte Comparison:
Next is Sunset, a beautiful bright coral orange jelly with tiny yellow matte glitter and blue/orange hexes. I had no need to fish for glitter with this polish. Also, the formula on this one was wonderful, it went on so smoothly. I applied 3 coats for opacity.
Holding Creative Cuticles Nail Polish "Sunset":
3 coats plus top coat/matte top coat on ring finger:
Glossy/Matte Comparison:
So what do you guys think? Which one is your favorite of the 2? Mine would have to be Sunset, I just love the color and the fact that it's a jelly polish. This was my first time trying out this indie brand, and I have to say it's made a good first impression. Hopefully I'll be able to purchase some polishes from Kayla in the near future. By the way, I've linked her store and social medias down below if you're interested.

Creative Cuticles Nail Polish: Storenvy - Instagram - Facebook

Well I hope you all enjoyed this review, and the swatches of course. Thanks for stopping by, and until next time.
-Ana

Top Coats Used:
Glossy: Glisten & Glow "HK Girl Top Coat"
Matte: Wet N Wild "Matte Top Coat"

Monday, July 20, 2015

Flowers, Leaves and Dandelions

 Purchased By Me / Press Sample / Giveaway Prize 

Hi guys! Today I have some nail art to share with you. I recently received some nail art water decals I purchased from the Born Pretty Store, and I just had to try them out. At first, I couldn't decide what to do as a background for the decals. I thought about a gradient or a solid color, but I ended up picking "Sweet Spring" by Stardust Polish, which made a perfect background for these beautiful and delicate decals.
Holding Stardust Polish "Sweet Spring":
I must confess that I did have a problem in the beginning, but I think it was because I didn't submerge the decals for the right amount of time. I ended up trying to apply them like temporary tattoos because they wouldn't slide off the paper, and when I added the top coat they smeared. I had some really bad luck in the beginning, so I decided to look for a tutorial. It just so happened that dutchnailss from Instagram had barely uploaded a tutorial to her YouTube channel using the same kind of decals I purchased. In her video, she says we have to submerge them for 10-20 seconds. Since it didn't work for me when I submerged them for 10 seconds, I decided I'd wait for 20 just to make sure it would work, and it did. Watching her tutorial helped me a lot, so if you're having trouble you should probably take a look at it. Well after finally getting the hang of it, it was so easy to complete the mani. The sheet I used was BP-W13 which has dandelions (item ID #20699). I applied the decals, and patted them dry with a napkin. I also decided I'd wait a while before applying top coat, and that probably helped because they didn't smear. Every time I try a new technique, I sometimes have a problem, it just takes practice and patience to get the hang of it. Not only did I learn to apply decals, but it ended up being a success for me.
Close-Ups:
I love how easily you can get such a pretty mani with these decals. They're perfect if you don't have the time to do an intricate design, or if you're too lazy. Haha.

Well, I hope you guys enjoyed the post. Oh and remember, you can use my code ANNYW10 for 10% off your Born Pretty Store purchase. Thanks for stopping by, and until next time.
-Ana

Polishes Used:
Stardust Polish "Sweet Spring" (Press Sample)
Glisten&Glow "HK Girl Top Coat" (Giveaway Prize)

Saturday, July 4, 2015

4th of July Nail Art

(Purchased By Me, Gift, Giveaway Prize)

Happy Fourth of July! If you guys are celebrating, then I hope you have a fun and safe holiday. To those who aren't, may you have a wonderful weekend as well.

I usually forget to do holiday manis, but this time I did 2 just for fun. The first one is a holo 4th of July mani with studs and some glitter placement, the second one is an incredibly sparkly striping tape mani with silver glitter stars. I've listed all the polishes I used at the end of the post like I usually do.

For the first mani, I chose a blue holo (Aria) for my index finger. On my middle and pinky I did a white base (Snow Me White), and on my ring finger I put on a silver base (Liquid Metal). I put on some top coat on my middle and pinky so I could lay down the striping tape, and then added the according polish on top. For the pinky, I did 2 "V" shapes with the striping tape, and filled in the top and bottom with red and blue. It was supposed to be white in the middle, but the red smeared, so I decided to add the glitter. I also added a silver holo glitter (Spice It Up) over the silver base on my ring finger to add some sparkle. The studs I added were originally neon colored, but I used the silver polish to paint the star stud, and the light blue holo to paint the circle stud.
Holding LACC Beauty "2013 Top Coat":
Close-Ups of Index/Ring Finger:
For my second mani, I decided I'd do something more flashy and sparkly. Who needs fireworks when you've got glitter, right? Oh, and not just any glitter but holo glitter. Hehe. Well, I used a blue jelly polish (Kinda Jazzy) on my index finger, and a red jelly polish (Angry Angel) on my middle and pinky. On my ring finger, I put down some striping tape and painted on the blue. Then I just added the red underneath very carefully, trying not to get it on the blue. When that all dried I added some top coat on all the nails on which I'd be using striping tape, and then proceeded to place it when dry. When I had all the striping tape placed on my nails, I sponged on the silver holo glitter (Spice It Up) on top. To finish off I placed the silver stars on the blue parts of my nails to complete the flag look, and I added top coat. I love how this mani turned out. It's so sparkly, and I like the texture it has.
Holding Stardust Polish "Angry Angel":
Close-Ups:
Well I hope you liked these 2 different 4th of July designs. If you have any questions, please leave them below. Also if you recreate these, make sure to tag me on Instagram, and use the hashtag #annypolishandpaint so I can see it. Thank you for stopping by, and may you all have a great weekend. Until next time guys.
-Ana

Polishes Used:
First Mani:
Blue Holo: Daily Hues Nail Lacquer "Aria"
Red Holo: Daily Hues Nail Lacquer "Carol"
White: Sinful Colors "Snow Me White"
Silver: Elf Nail Polish "Liquid Metal"
Silver Glitter: Bonita Colors "Spice It Up"
Top Coat: LACC Beauty "2013 Top Coat"

Second Mani:
Blue: Stardust Polish "Kinda Jazzy" 
Red: Stardust Polish "Angry Angel"
Silver Glitter: Bonita Colors "Spice It Up"
Top Coat: LACC Beauty "2013 Top Coat"