Showing posts with label OPI. Show all posts

Tuesday, October 10, 2017

Lavish Polish: "Psychedelic Wonderland" & "Deadly Romance"

 Press Sample 

Hi guys! Today I have swatches of 2 polish exclusives by Lavish Polish for The Indie Shop. It will be taking place this Friday, October 13th in San Antonio, Texas. Check out TIS Instagram for more information.
Pic Credit: The Indie Shop Facebook Page
First up is Psychedelic Wonderland, which is the Event Exclusive and was inspired by Alice in Wonderland. It's described as a dark green jelly with shimmering green and blue pigment, plus multi-chrome flakies. Make sure to wear a base coat with this one because I noticed it left a bit of staining behind, it wasn't terrible, but I let Emely know. I did suspect it might have been that dark green base, which she confirmed, but I just love this color too much to mind. My swatches show 2 coats plus top coat/matte top coat on ring finger.
2 coats plus top coat/matte top coat on ring finger:
Glossy:
Matte:
I also did some nail art inspired by Emely's inspiration picture.
Close-Ups:
The second polish is the VIP Event Exclusive, which Emely will also have available at her table. Deadly Romance was inspired by Emily from the Corpse Bride. It's described as a blue crelly with holo and multi-chrome flakies. My swatches show 2 coats plus top coat/matte top coat on ring finger.
2 coats plus top coat/matte top coat on ring finger:
Glossy:
Matte:
For the nail art, I was inspired by the scene where Emily turns into butterflies.
Close-Ups:
Well I loved both polishes, make sure to grab these beauties if you're attending the event. I hope you enjoyed the swatches and nail art. Thanks for stopping by and until next time.
-Ana

Top Coats Used:
Glossy: Seche Vite
Matte: Wet N Wild "Matte Top Coat"

Psychedelic Wonderland Mani:
Sea Foam Green: Lavish Polish "Bora Bora"
Light Blue: Lavish Polish "Bahamas"
Black: Serendipity Polish "Building My Empire"
Charcoal Holo: Serendipity Polish "CE0,000,000"
Tree Stamping Plate: Born Pretty Store item #35742 (BP-L057)
Girl Stamping Plate: Born Pretty Store item #38219 (Celebration BPX-L013)
Watermarble Circle Stamping Plate: Born Pretty Store item #17264 (BP-19)
Medium Clear Jelly Stamper: Born Pretty Store item #26498
Manicure Saver Cotton Claw Tool: Born Pretty Store item #32220
Cuticle Guard Peel-Off Latex: Born Pretty Store item #36614

Deadly Romance Mani:
Black: Serendipity Polish "Building My Empire"
Blue Creme: Nicole by OPI "I Sea You and Raise You"
Butterfly Stamping Plate: Born Pretty Store item #17267 (BP-22)
Medium Clear Jelly Stamper: Born Pretty Store item #26498
Manicure Saver Cotton Claw Tool: Born Pretty Store item #32220
Cuticle Guard Peel-Off Latex: Born Pretty Store item #36614

*Past Press Samples: Lavish Polish "Bora Bora", "Bahamas"; Born Pretty Store Tree/Girl/Watermarble Circle Stamping Plates, Medium Clear Jelly Stamper, Manicure Saver Cotton Claw Tool.
*Giveaway Prizes: Serendipity Polish "Building My Empire", "CE0,000,000".

Wednesday, September 6, 2017

A Weekly Dose of Rainbows: Dotticure

Hi guys! So I'm a few days late, but better late than never. This month's theme for A Weekly Dose of Rainbows was Dotticure. I knew I wanted to use Fall colors, but didn't have a specific idea on how I'd be placing the dots. I was a bit inspired after seeing a dotticure mani by Jessica on Instagram, I just loved the colors she used. You should definitely go check out her page. Anyway, here's my mani.
Close-Ups:
I don't have different sized dotting tools, so I just tried making different sized dots with what I had. But I do feel like I overdid it with the dots. I hope you guys still like it though.

As always, thanks for stopping by. Until next time.
-Ana

Products Used:
Beige: L'Oreal "Shinetastic"
Green: OPI "Christmas Gone Plaid"
Purple: OPI "I Carol About You"
Brown: OPI "Love Is Hot and Coal"
Top Coat: Seche Vite

Tuesday, January 3, 2017

Born Pretty Store Review: Halloween Plates & Rhinestones

 Press Sample / Giveaway Prize / Purchased By Me 

Happy New Year guys! Today I have an overdue review for you. Now I know Halloween came and went, but I'm sure that those of you that love Halloween as much as I do, won't mind seeing some Halloween manis.

Before I begin I will say that the items did take a bit longer than usual to arrive this time. They usually take 4 weeks or so, and this time they took almost double the time. I did message Cynthia from Born Pretty Store though, and she informed me the items were a bit delayed due to customs, but on their way. She is always very kind and helpful which is great.

The good thing was that everything arrived safely as always. The bad thing was that I got sick right in the middle of when I was doing my manis. I actually just started to feel better a few days back, but it completely messed up my mani schedule. So getting this done took a bit longer than I anticipated, and for that I apologize. Okay, now that I've gotten that out of the way, how about some manis?

The first plate is this Trick-Or-Treat Plate BP-81 (item #23264). It has some very cute and non-creepy images, perfect if you don't want a scary mani.
For my mani, I decided to go the traditional route with the color scheme. I used orange, yellow, white and black. I picked up 4 images and did some reverse stamping. Aren't they so cute? Although I accidentally smeared the jack-'o-lantern face.
Close-Ups:
The second plate is this Dracula Plate BP-122 (item #35741). It's a bit more spooky, it has some evil looking pumpkins and even an eye.
For my mani, I ended up picking the pumpkins. Once again, I picked up the images and did some reverse stamping on the pumpkin. It has a kind of 3D look, pretty cool right?
Close-Ups:
The third plate is this Halloween Silhouettes Rectangular Plate BPL-031 (item #23267). It mostly has some fun silhouettes, but it does have a more dark/creepy one too.
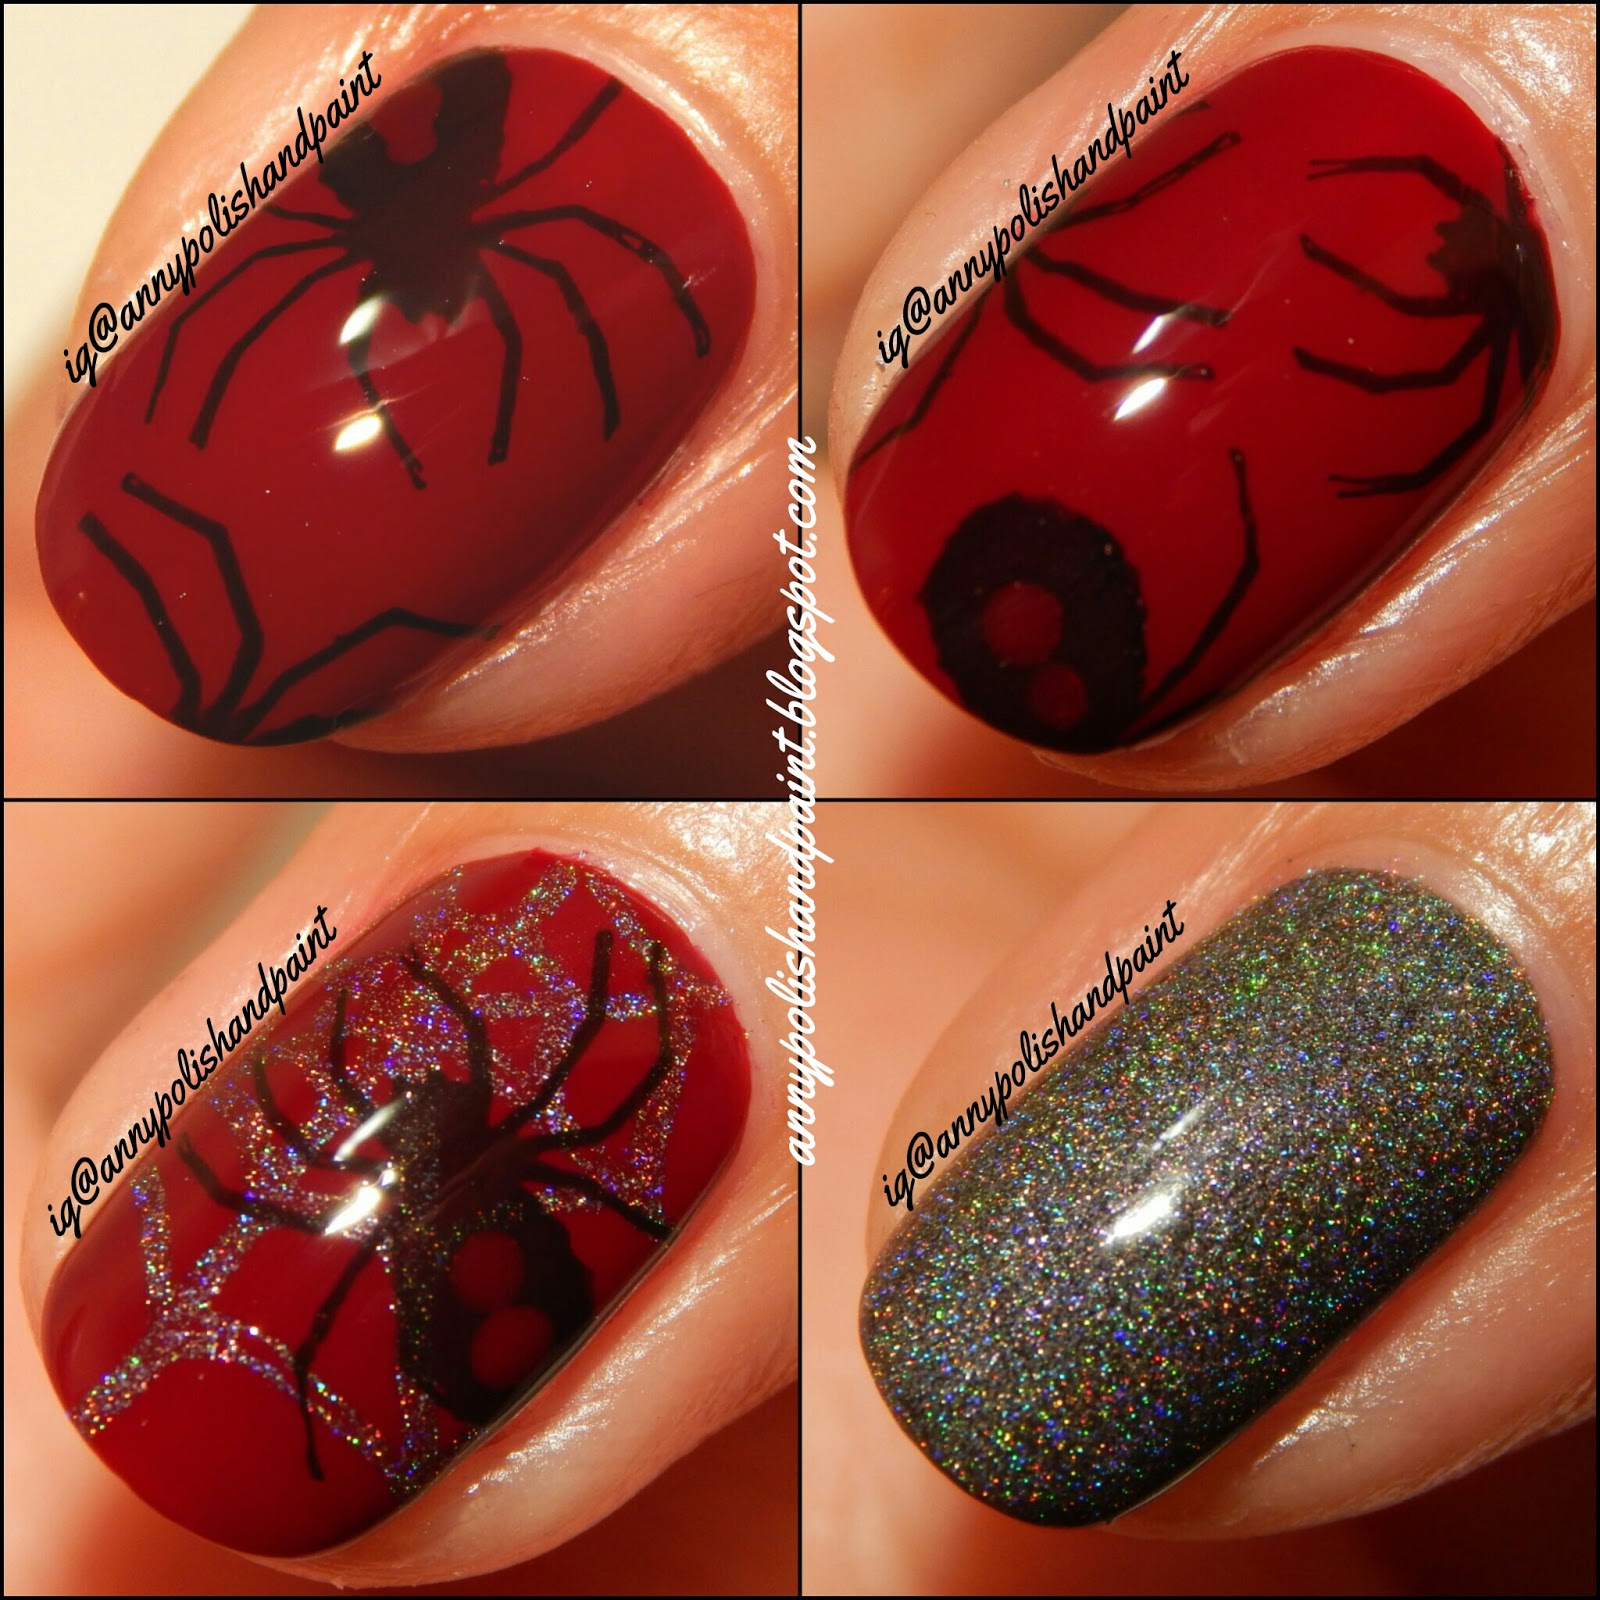
The first mani I did with this plate is this cool Black Widow mani. I did struggle quite a bit when trying to pick up the web image, it's so close to the edge and I'd never worked with a rectangular plate before. All I need is practice, I'm sure.
Close-Ups:
I also received this awesome Black Rhinestone Wheel (item #12412). The listing says it has about 500 pieces, and they come in a variety of sizes. I love the size variety because you can choose the size that best suits your design and/or style.
This is the mani I did using both the rectangular plate I showed you last, and the rhinestones. I went for a cute witchy design. I loved the silhouettes.
Close-Ups:
The last stamping plate is this Ghost and Skulls Rectangular Plate BP-L057 (item #35742). It had some adorable and spooky designs. I think one of my favorites was the image I used for my next mani.
I thought the little ghost/bat design was so cute, I just had to use it. Since the image had bats, I decided to use a bat design on the rest of my nails. I liked how it looked with the bright lime green neon as my base color.
Close-Ups:
The last items I received for review were these Blue Rhinestones (item #5178), color #15 on the drop-menu. The listing says you get around 20 pieces, I only photographed a few though.
For this next mani, I used the last rectangular plate I showed you and the rhinestones. The rhinestone really tied the whole design together, and I loved the end result of this Haunted House mani.
Close-Ups:
Overall, I had a good experience with all the items. The only difficulty I encountered was when I couldn't pick up the images on the edges of the rectangular plates. But like I said before, I'm sure I just need to practice. I'm not an experienced stamper by any means, so if you aren't either (or you're just beginning) don't get discouraged. Stamping is something you can master with practice and patience. I definitely haven't mastered it yet, but I'm working on it. Hehe.

The only problem was that the items got here later than usual. I'm not sure if it's just because of the craziness of the holiday season and USPS being lame, but the items arrived much later than I expected. Other than that I have no other complaints.

Well I really hope you guys enjoyed the review and manis, I had tons of fun coming up with these designs. If you plan to make a purchase from Born Pretty Store, remember to use my code ANNYW10 to get 10% off any regular priced items.

Before I go, I want to wish you all a blessed 2017; full of laughter, health and happiness.

As always, thank you for stopping by and until next time.
-Ana

Products Used:
Black Creme Polish: Serendipity Nail Polish "Building My Empire"
Dark Red Creme Polish: Serendipity Nail Polish "Less Whine, More Wine!"
Orange Creme Polish: Covergirl "#ElectroGlow"
Yellow Creme Polish: Covergirl "#GetGlowing"
Purple Shimmer Polish: OPI "I Carol About You"
Charcoal Holo Polish: Serendipity Nail Polish "CE0,000,000"
Lime Green Neon Flakie Polish: Love, Angeline "Apple Blossom"
Neon Orange Polish: Love, Angeline "Mac-N-Tosh"
Green Flakie Polish: Supernatural Lacquer "Avalon 2.0"
Light Gray Flakie Polish: Supernatural Lacquer "Calliope"
Dark Blue Flakie Polish: Glam Polish "Night of the Living Dummy"
Brown Micro-Glitter Polish: Creative Cuticles Nail Polish "Pumpkin Spice"
Black Stamping Polish: Born Pretty Store item #18135
White Stamping Polish: Born Pretty Store item #18136
Top Coat: LACC Beauty "2013 Top Coat"
Clear Jelly Stamper: Born Pretty Store item #26498
Lime Green Star Stud: Born Pretty Store item #14438

*Stamping Plates and Rhinestones I reviewed in this post were Press Samples. Serendipity Nail Polish "Building My Empire", "Less Whine, More Wine!", "CE0,000,000"; Love, Angeline "Apple Blossom", "Mac-N-Tosh"; Glam Polish "Night of the Living Dummy"; LACC Beauty "2013 Top Coat" were all giveaway prizes. Creative Cuticles Nail Polish "Pumpkin Spice"; Born Pretty Store Black Stamping Polish, White Stamping Polish, Clear Jelly Stamper were past Press Samples.

Wednesday, September 16, 2015

Pretty in Purple & Silver

 Purchased By Me / Gift / Giveaway Prize* 

Hi guys! Today's nail art is full of purples and silver, oh and a bit of holo glitter of course. Hehe.
Well I sat down to do some nail art, but had no real plan or vision of what I was going to do. I pretty much just picked some polishes I thought would look good together, including Sinful Colors Berry Charm which I've been wanting to use, and started to work.
Close-Ups:
I started with a coat of my diy peel off base coat, and then I added my base colors. Berry Charm is so pretty, but I had to be careful with it because it did flood my cuticle a bit. I top coated and waited a good 15-20 minutes before applying my diamonds vinyl, which are from Twinkled T. Once I put my vinyl down, I sponged on a diagonal gradient using Elf Nail Polish W2 and Liquid Metal. On my ring finger I did a glitter gradient with OPI Desperately Seeking Sequins which is super sparkly, over Berry Charm. I kept it simple on my pinky and index finger. Liquid Metal is on my pinky, and W2 on my index with a silver stud from the decoration wheel (item ID #7277) I purchased from the Born Pretty Store. Remember, you can use my code ANNYW10 for 10% off your purchase. All that was left to do was finish with top coat.
Holding OPI "Desperately Seeking Sequins":
I'm really satisfied with the outcome, I think it looks nice.

Well I really hope you liked this design. If you decide to recreate it don't forget to use my hashtag annypolishandpaint on Instagram so I can see, you can also tag me if you'd like. Thank you for stopping by, and until next time.
-Ana

Polishes Used:
Purple Creme: Sinful Colors "Berry Charm"
Purple Shimmer: Elf Nail Polish "W2"
Silver: Elf Nail Polish "Liquid Metal"
Glitter Topper: OPI "Desperately Seeking Sequins"
Top Coat: Glisten & Glow "HK Girl Glossy Top Coat"

*Twinkled T vinyls and OPI Desperately Seeking Sequins were a giveaway prize