Showing posts with label StardustPolish. Show all posts

Saturday, February 13, 2016

A Weekly Dose of Rainbows: Rainbow Love

 Purchased By Me / Giveaway Prize / Press Sample 

Hi guys, I hope your Saturday is going better than mine. I'm sick, and I feel horrible. Thursday's theme for A Weekly Dose of Rainbows was Rainbow Love, I was supposed to post this yesterday at the latest, but I wasn't able to so I apologize. So, I did this mani pretty quickly while on the couch, which was kind of difficult. Lol. But here's what I came up with, I hope you like it.
I started with a white crelly from Stardust Polish (now Stardust Beauty) on my index finger, ring finger and pinky. On my middle finger I used a bright and pretty textured polish from Sinful Colors. When each nail was opaque I top coated because I'd be using a nail vinyl. I placed the nail vinyl on my ring finger and applied the textured polish over it. Remember to remove the vinyl right away before the polish dries. To kind of tie the look together, I added 3 dots down my index and pinky as well. Once everything dried, I top coated.
Close-Ups:
It was a very simple mani, but I hope you guys liked it. Thanks for stopping by, may you have a wonderful weekend and until next time.
-Ana

Products Used:
Crelly: Stardust Polish "I Love You Gnome Matter What"
Pink Texture: Sinful Colors "Ruby Mine"
Top Coat: Love, Angeline "Topped With Love"
Vinyls: Twinkled T Hearts Stencil

*Twinkled T vinyls were a giveaway prize; Stardust Polish "I Love You Gnome Matter What" and Love, Angeline "Topped With Love" were Press Samples.

Wednesday, December 16, 2015

"Kinda Jazzy" Snowflakes

 Giveaway Prize / Press Sample 

Hi guys, can you believe we're less than 10 days away from Christmas? That's just insane. Anyways, today I have a holiday mani to share with you, I hope you like it.
Holding Love, Angeline "Topped With Love":
I started off with Stardust Polish "Kinda Jazzy" which is absolutely gorgeous. Each time I put it on, I fall in love with it all over again. I did 2 coats and added top coat, then I painted on the snowflakes with gold acrylic paint and a brush. I finished off with top coat once everything dried.
Landscape View:
Close-Ups:
I wasn't so happy with how the snowflakes turned out, but I hope you guys liked them. Thanks for stopping by, until next time.
-Ana

Polishes Used:
Blue: Stardust Polish "Kinda Jazzy"
Top Coat: Love, Angeline "Topped With Love"

*Stardust Polish "Kinda Jazzy" was a giveaway prize; Love, Angeline "Topped With Love" was a Press Sample.

Tuesday, November 17, 2015

The Polished Bookworms: October 2015

 Purchased By Me / Gift / Giveaway Prize 

Hey guys, sorry for the huge delay with this post. I have not finished October's book just yet, but decided to do a mani anyways. I was really enjoying it, but got kind of busy and I stopped reading. October's read was All the Light We Cannot See by Anthony Doerr. I took inspiration from the jewel that was talked about, the Sea of Flames, it was described as a beautiful blue stone with a hint of red at its center.
I started off with a white base to make the colors pop, and did a circular gradient with blue and red polishes over that. Once I was done with the gradient, I sponged on a red glitter jelly polish over the red, and a blue glitter jelly polish over some of the blue. I'm so happy that I did because it ended up looking so much more beautiful. It also gives it more depth. Last thing to do was top coat of course. I love how this came out, and I hope it was worth the wait guys.
Close-Ups:
With the Book:
Thank you for stopping by, and until next time.
-Ana

Polishes Used:
Sinful Colors "Snow Me White"
Sinful Colors "Keira Blu"
Elf Nail Polish "Skinny Jeans"
Elf Nail Polish "Smokin Hot"
Stardust Polish "Angry Angel"
Stardust Polish "Kinda Jazzy"
Glisten & Glow "HK Girl Glossy Top Coat"

*Glisten & Glow "HK Girl" and Stardust Polish "Kinda Jazzy" were giveaway prizes

Thursday, September 3, 2015

The Polished Bookworms: August 2015

 Purchased By Me / Giveaway Prize* 

Hey guys! I'm a few days late, but I finally have my TPB mani. I had lots of ideas on what to base my mani off of, but when the time came to do the nail art, I couldn't decide what to do. I've also been struggling with a bit of nail art block which made it even worse, so I'm glad I was able to come up with something.

So for the month of August, we read The Night Circus by Erin Morgenstern. I absolutely loved this book and I highly recommend it. I was instantly intrigued by the magical story of the circus. The author did a wonderful job of describing the circus in detail, it just made you feel like you were there. I took inspiration from the reveurs, which is why I used red in my mani. The swirly black and white nail represents the circus, tents and color scheme of the circus. The black nail with glitter was inspired by the dress Celia wore in her performance. It was described as a black gown with sparkling crystals. Lastly, the tear-shaped stud stands for one of my favorite tents, the Pool of Tears.
Holding Stardust Polish "Angry Angel":
To make the swirl design on my middle finger, I used some nail vinyls from Twinkled T. I first used white polish as my base color and then did a coat of top coat. I let the top coat dry for 15-20 minutes so the vinyls wouldn't lift up the polish. After that, I put down the vinyl and sponged on the black polish. I took off the vinyl when the polish was still wet and let that dry until I could top coat. On the rest of the nails, I just put down my base color and added the glitter/stud. The stud is from a stud wheel I purchased from the BornPrettyStore, it's item #7277 in case you're interested. Remember, you can use my code ANNYW10 for 10% off your purchase.
Side-View:
Close-Ups:
With the Book:
Well I really hope you guys liked this mani as much as I did. Oh and you guys should check out The Night Circus, it's a great read. Now this month we'll be reading Yes, Please! by Amy Poehler. I'm still waiting on my copy from the library, so I hope I can get it in time. If you'd like to join the bookclub, I've added the links below.

The Polished Bookworms: Instagram - Facebook Group - Facebook Page

Thank you very much for stopping by, and until next time.
-Ana

Polishes Used:
Red: Stardust Polish "Angry Angel"
Black: Wet N Wild "Black Creme"
White: Sinful Colors "Snow Me White"
Glitter Topper: Wet N Wild "Kaleidoscope"
Top Coat: Glisten & Glow "HK Girl Glossy Top Coat"

*Twinkled T vinyls and HK Girl Glossy Top Coat were a giveaway prize

Wednesday, August 5, 2015

Guest Post At Nails Like Lace

Hi guys, I hope you're all doing well. Today I have a guest post for Amber over at Nails Like Lace. Amber always does such fun nail designs, and she's super nice. You should give her a follow if you don't yet, you won't be disappointed. Oh, and while visiting her page, you can check out the other guest posts.

So, here's the nail art I did for my guest post. Head on over to her blog to read more about it and see more pictures. Just click here, and it'll take you directly to the blog post.
Thanks for stopping by.
-Ana

Monday, July 20, 2015

Flowers, Leaves and Dandelions

 Purchased By Me / Press Sample / Giveaway Prize 

Hi guys! Today I have some nail art to share with you. I recently received some nail art water decals I purchased from the Born Pretty Store, and I just had to try them out. At first, I couldn't decide what to do as a background for the decals. I thought about a gradient or a solid color, but I ended up picking "Sweet Spring" by Stardust Polish, which made a perfect background for these beautiful and delicate decals.
Holding Stardust Polish "Sweet Spring":
I must confess that I did have a problem in the beginning, but I think it was because I didn't submerge the decals for the right amount of time. I ended up trying to apply them like temporary tattoos because they wouldn't slide off the paper, and when I added the top coat they smeared. I had some really bad luck in the beginning, so I decided to look for a tutorial. It just so happened that dutchnailss from Instagram had barely uploaded a tutorial to her YouTube channel using the same kind of decals I purchased. In her video, she says we have to submerge them for 10-20 seconds. Since it didn't work for me when I submerged them for 10 seconds, I decided I'd wait for 20 just to make sure it would work, and it did. Watching her tutorial helped me a lot, so if you're having trouble you should probably take a look at it. Well after finally getting the hang of it, it was so easy to complete the mani. The sheet I used was BP-W13 which has dandelions (item ID #20699). I applied the decals, and patted them dry with a napkin. I also decided I'd wait a while before applying top coat, and that probably helped because they didn't smear. Every time I try a new technique, I sometimes have a problem, it just takes practice and patience to get the hang of it. Not only did I learn to apply decals, but it ended up being a success for me.
Close-Ups:
I love how easily you can get such a pretty mani with these decals. They're perfect if you don't have the time to do an intricate design, or if you're too lazy. Haha.

Well, I hope you guys enjoyed the post. Oh and remember, you can use my code ANNYW10 for 10% off your Born Pretty Store purchase. Thanks for stopping by, and until next time.
-Ana

Polishes Used:
Stardust Polish "Sweet Spring" (Press Sample)
Glisten&Glow "HK Girl Top Coat" (Giveaway Prize)

Saturday, July 4, 2015

4th of July Nail Art

(Purchased By Me, Gift, Giveaway Prize)

Happy Fourth of July! If you guys are celebrating, then I hope you have a fun and safe holiday. To those who aren't, may you have a wonderful weekend as well.

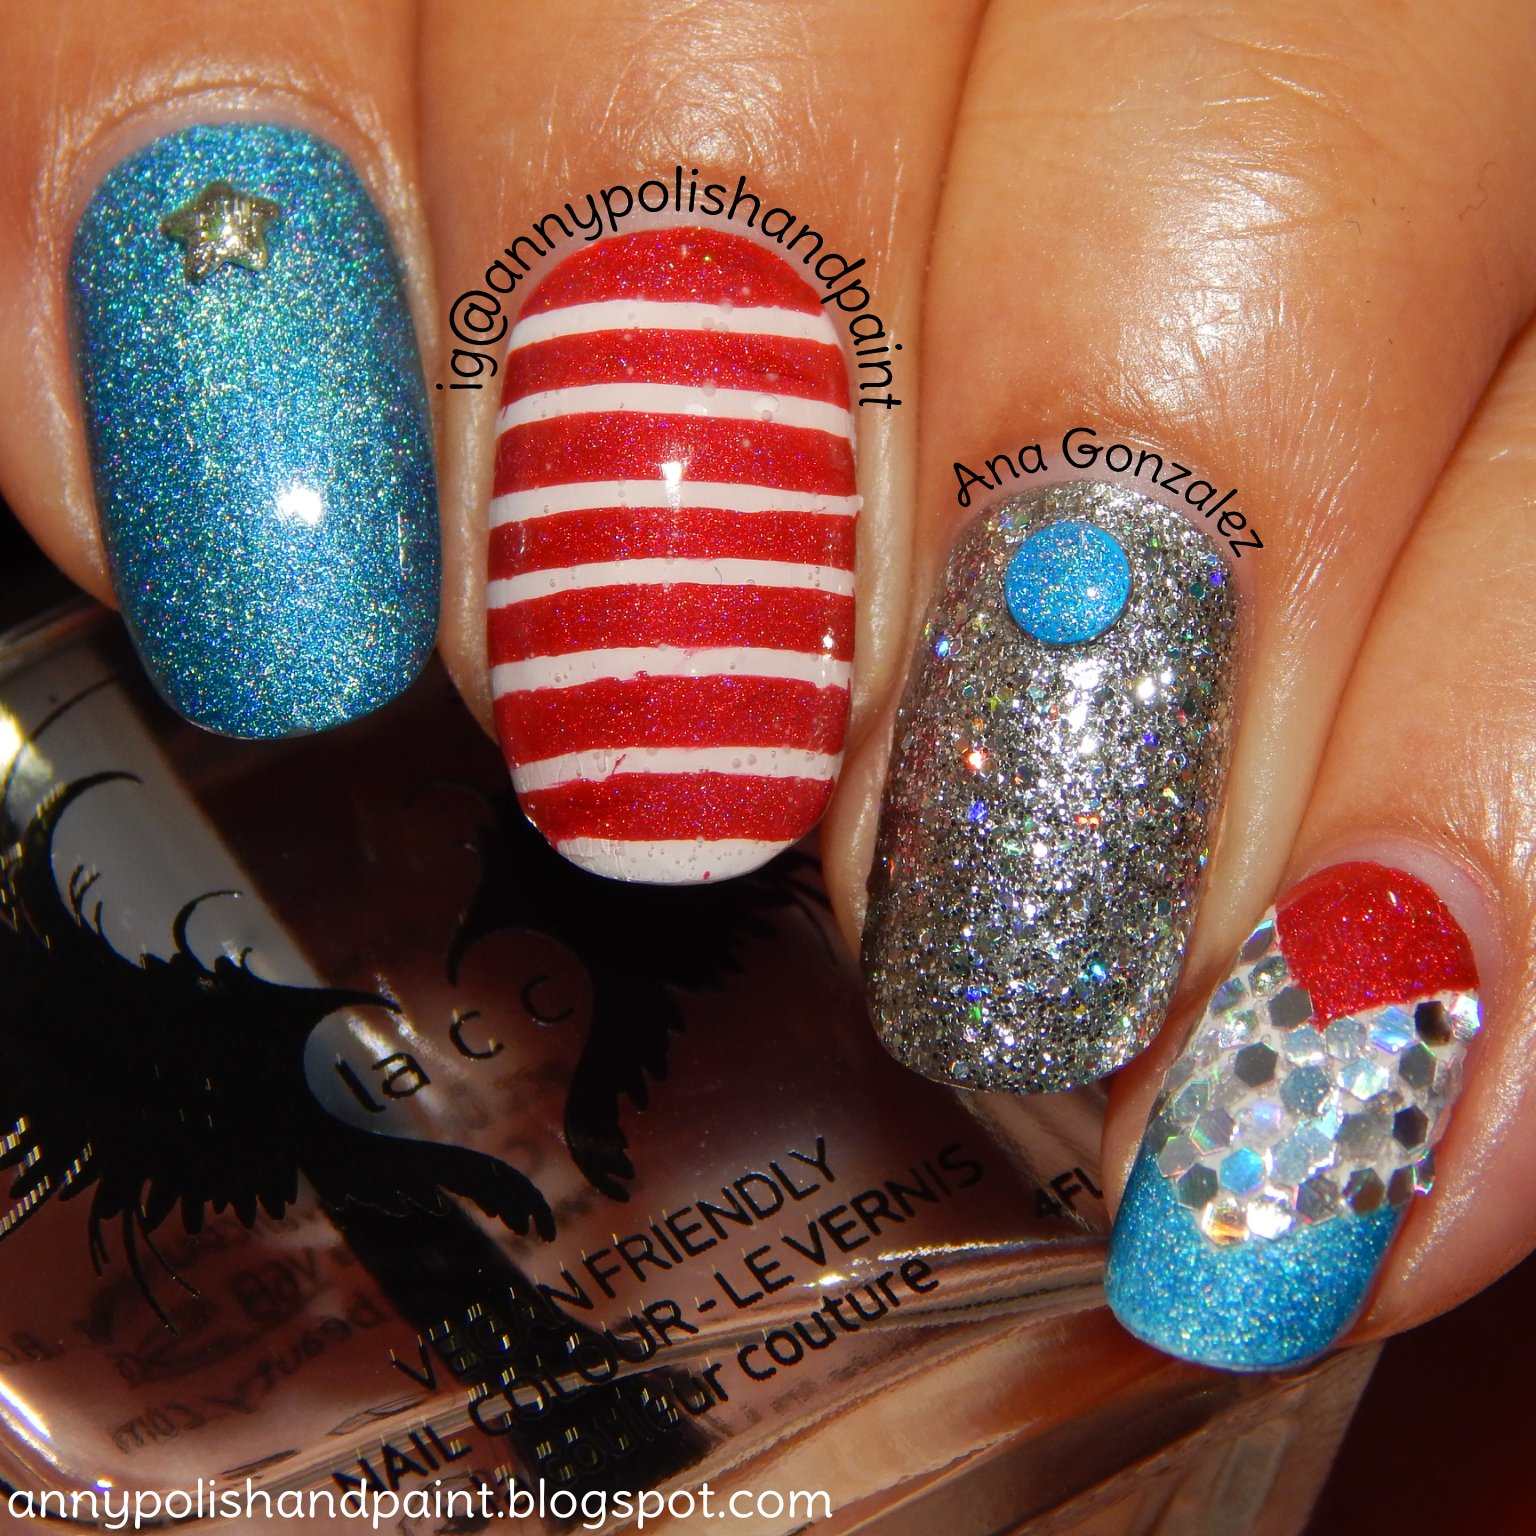
I usually forget to do holiday manis, but this time I did 2 just for fun. The first one is a holo 4th of July mani with studs and some glitter placement, the second one is an incredibly sparkly striping tape mani with silver glitter stars. I've listed all the polishes I used at the end of the post like I usually do.

For the first mani, I chose a blue holo (Aria) for my index finger. On my middle and pinky I did a white base (Snow Me White), and on my ring finger I put on a silver base (Liquid Metal). I put on some top coat on my middle and pinky so I could lay down the striping tape, and then added the according polish on top. For the pinky, I did 2 "V" shapes with the striping tape, and filled in the top and bottom with red and blue. It was supposed to be white in the middle, but the red smeared, so I decided to add the glitter. I also added a silver holo glitter (Spice It Up) over the silver base on my ring finger to add some sparkle. The studs I added were originally neon colored, but I used the silver polish to paint the star stud, and the light blue holo to paint the circle stud.
Holding LACC Beauty "2013 Top Coat":
Close-Ups of Index/Ring Finger:
For my second mani, I decided I'd do something more flashy and sparkly. Who needs fireworks when you've got glitter, right? Oh, and not just any glitter but holo glitter. Hehe. Well, I used a blue jelly polish (Kinda Jazzy) on my index finger, and a red jelly polish (Angry Angel) on my middle and pinky. On my ring finger, I put down some striping tape and painted on the blue. Then I just added the red underneath very carefully, trying not to get it on the blue. When that all dried I added some top coat on all the nails on which I'd be using striping tape, and then proceeded to place it when dry. When I had all the striping tape placed on my nails, I sponged on the silver holo glitter (Spice It Up) on top. To finish off I placed the silver stars on the blue parts of my nails to complete the flag look, and I added top coat. I love how this mani turned out. It's so sparkly, and I like the texture it has.
Holding Stardust Polish "Angry Angel":
Close-Ups:
Well I hope you liked these 2 different 4th of July designs. If you have any questions, please leave them below. Also if you recreate these, make sure to tag me on Instagram, and use the hashtag #annypolishandpaint so I can see it. Thank you for stopping by, and may you all have a great weekend. Until next time guys.
-Ana

Polishes Used:
First Mani:
Blue Holo: Daily Hues Nail Lacquer "Aria"
Red Holo: Daily Hues Nail Lacquer "Carol"
White: Sinful Colors "Snow Me White"
Silver: Elf Nail Polish "Liquid Metal"
Silver Glitter: Bonita Colors "Spice It Up"
Top Coat: LACC Beauty "2013 Top Coat"

Second Mani:
Blue: Stardust Polish "Kinda Jazzy" 
Red: Stardust Polish "Angry Angel"
Silver Glitter: Bonita Colors "Spice It Up"
Top Coat: LACC Beauty "2013 Top Coat"

Friday, May 15, 2015

Lupus Awareness Month

Happy Friday everyone! Today's mani is for Lupus Awareness Month. I wanted to do a mani to show support for those who have lupus, especially my dear friend Abby who suffers from this disease. Lupus is a disease where the person's immune system attacks its own healthy cells and tissue, because it can't tell good and bad cells/tissue apart. It isn't contagious, and it can be treated.
Ribbon and butterfly images from Google, edit by me:
The Lupus Awareness ribbon is purple, and the symbol is a butterfly. So, I chose to do butterfly nails with a purple base. I thought "Color Me Happy" by Stardust Polish was perfect for it, I did 3 coats. To even it out and have a good surface to paint on, I did 1 coat of matte top coat. Once dry, I used acrylic paint to draw the butterfly wings. All that was left to do was to seal it all in with top coat.
Holding Stardust Polish "Color Me Happy":
Well that's pretty much it for this post. I hope it has shed some light on the topic, and if it's reached at least one person, then it's good enough. Thank you for stopping by, until next time everyone.
-Ana

Polishes Used:
Base Color: Stardust Polish "Color Me Happy"
Matte Top Coat: Wet N Wild "Matte Top Coat"
Top Coat: LACC Beauty "2013 Top Coat"

Friday, May 8, 2015

Angry Angel

Happy Friday everyone! I have a nail polish and nail art to show you today. I recently made my first indie purchase from Stardust Polish, and I'm so happy to finally have bought from an indie brand. I got some cuticle oil in the Green Apple scent, which smells so good by the way, and a polish named Angry Angel. The package got here in the time estimated, and was safely packaged.
Check out this stunning polish. Angry Angel is a dark red jelly with red holo square glitter and red and silver holo hex glitters in various sizes. All Stardust Polishes I've tried have all dried quickly, and this one did too. I just can't get over how amazing this polish is. It is definitely one of my favorites from my entire polish collection.
Now I must tell you that some of the pictures ended up looking a bit dark, so I apologize for that. I'm not sure why it happened, the rest of the pictures came out well lit (I guess I just have to improve my lighting). Be ready because I took lots of pictures. Anyways, for my swatches I did 3 coats to reach opacity. I applied 2 coats of matte top coat to even it out, and used a glossy top coat after.
Glossy Top Coat:
Matte Top Coat:
Glossy Top Coat:
Matte Top Coat:
Glossy Top Coat:
Matte Top Coat:
Glossy Top Coat:
Isn't it gorgeous!? It even inspired me to add something extra to it. I took out some striping tape and did some angled tips and an accent nail. The other polish I used for the nail art was Sinful Colors "Starry Night", a black jelly polish with silver holographic glitter and gold flecks (which I purchased late last year). I think both polishes go well together. Surprisingly my accent nail came out nicely, and it wasn't that difficult to do.
Holding Sinful Colors "Starry Night":
Striping Tape Nail Art:
Accent Nail Close-up:
If you'd like to follow or purchase Drema, I have her links below.

Stardust Polish: Instagram, Etsy Store, Facebook

Thanks for stopping by and I hope you all enjoy this Mother's Day weekend. Until next time everyone.
-Ana

Sunday, April 5, 2015

Happy Easter!

Happy Easter to those of you that celebrate. I hope you are all enjoying this beautiful Sunday with your family and loved ones. So I have some Easter nail art for you guys today. I chose 2 pretty Stardust polishes for my mani; a blue holo named "Stephany" (which I reviewed here), and a white crelly with aqua/pink glitters called "Sweet Spring" (which I reviewed here). I'll have Drema's links below if you'd like to follow her for Stardust Polish updates, or if you'd like to purchase from her.
For the nail art I did a bunny inspired by nailsbyic on Instagram. I also did some flowers, since I was already using a nail dotter. To finish off the flowers, I added some individual pink glitters in the middle. Lastly, I sealed everything in with top coat. They actually came out pretty cute, so that was nice.
Well I hope you enjoyed this short post, until next time guys.
-Ana

Stardust Polish: Etsy, Instagram, Facebook Page

Polishes Used:
White Crelly: Stardust Polish "Sweet Spring"
Blue Holo: Stardust Polish "Stephany"
Top Coat: LACC "2013 Top Coat"